> ## Documentation Index
> Fetch the complete documentation index at: https://anaconda.com/docs/llms.txt
> Use this file to discover all available pages before exploring further.
# Agents
export const DefinitionDescription = ({children}) => {children};
export const DefinitionTerm = ({children}) => {children};
export const DefinitionList = ({children}) => {children}
;
export const GCell = ({children, className}) =>
{children}
;
export const GTH = ({children, className}) =>
{children}
;
export const GRow = ({children}) => {children}
;
export const GBody = ({children}) => {children}
;
export const GHead = ({children}) => {children}
;
export const GTable = ({children, className, cols}) =>
{children}
;
Agents are the core entities in Agent Studio. Each agent is a self-contained AI system that can perform tasks, interact with users, and connect to external services.
## Creating an agent
There are multiple ways to create an agent:
1. Select **Agents** from the left-hand navigation.
2. Click **Create**.
3. Select a template to create the agent.
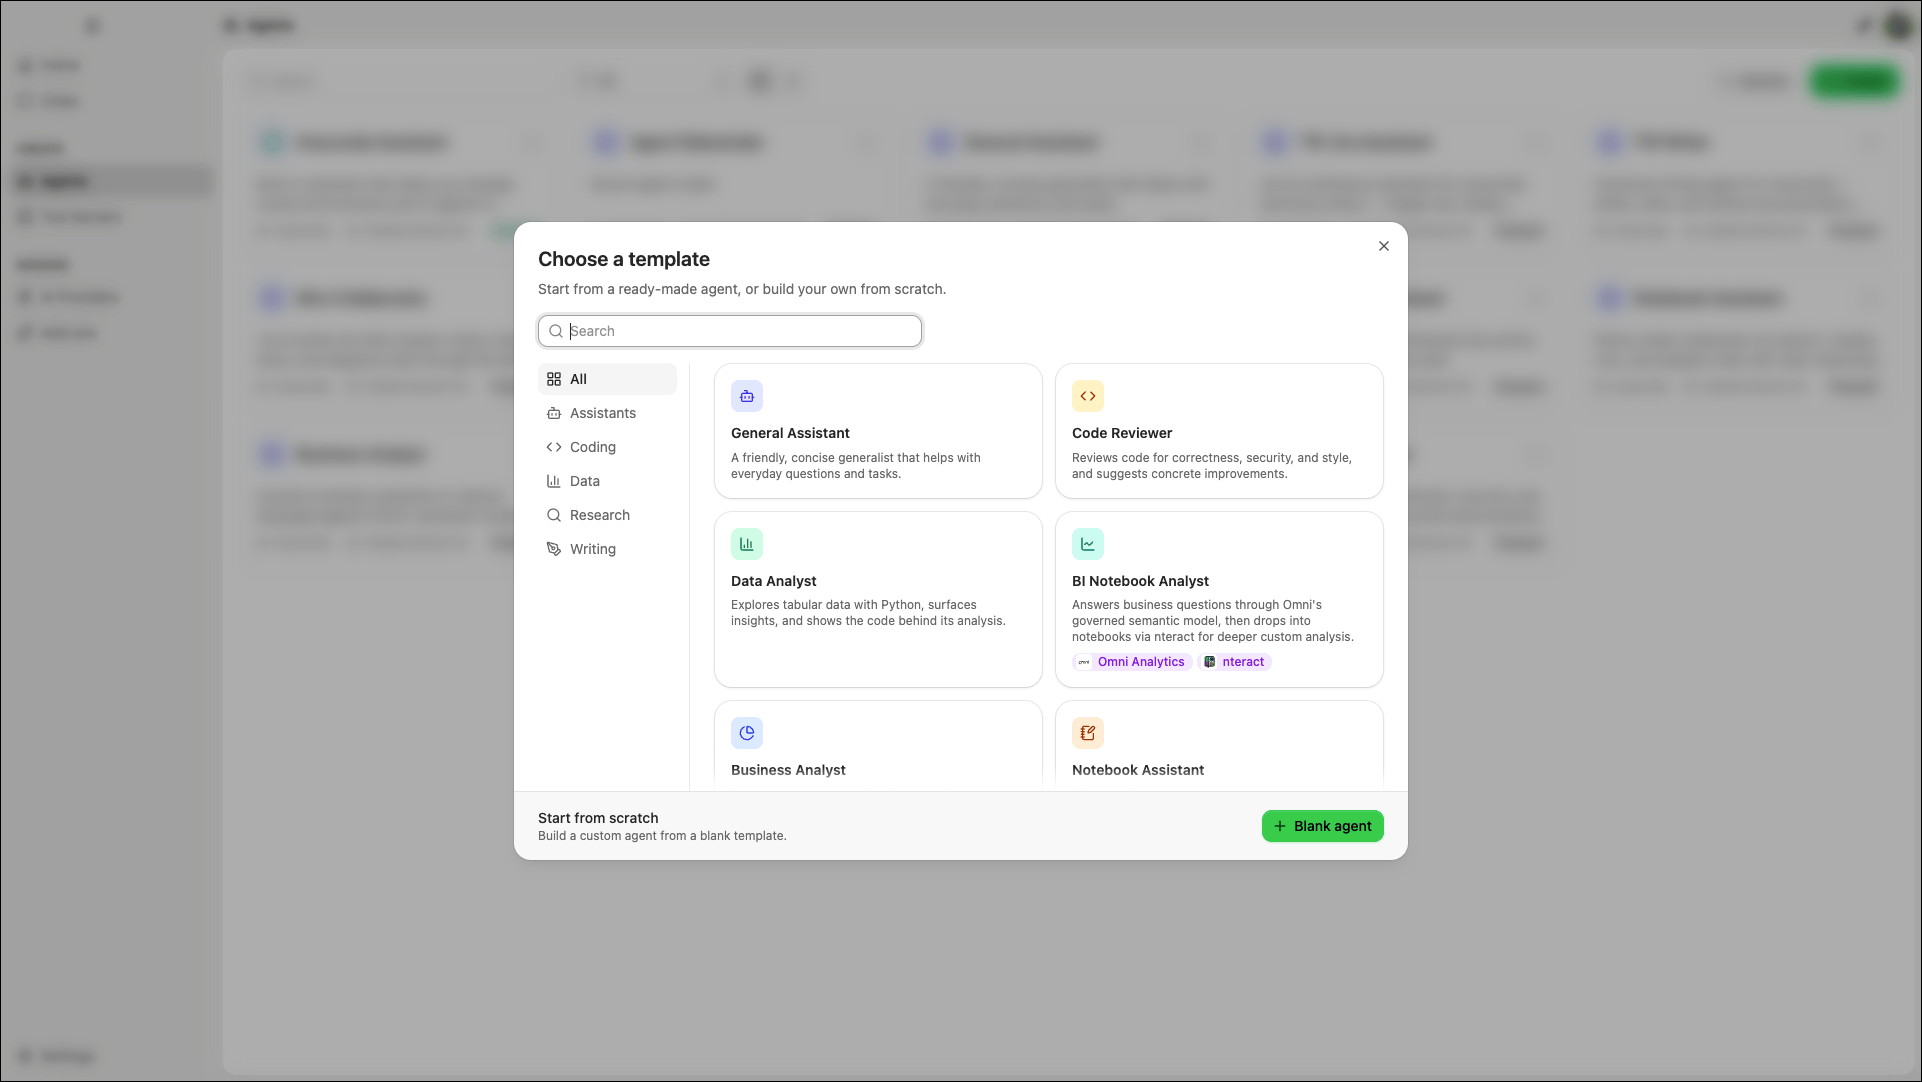 1. Select **Agents** from the left-hand navigation.
2. Click **Create**.
3. Click **Blank agent** at the bottom.
4. Enter a **Name** for your agent.
5. Select an **AI Provider** and **Model**.
6. Click **Create Agent**.
The Anaconda Assistant is available from the **Home** page, or by selecting in the upper-right corner of any page.
Describe the agent you want to create and the assistant handles the rest. Detailed requests that include your agent's purpose and intended behavior can result in a fully configured agent, including its system prompt, AI provider, and tools.
The agent's configuration page opens automatically after creation.
## Configuring your agent
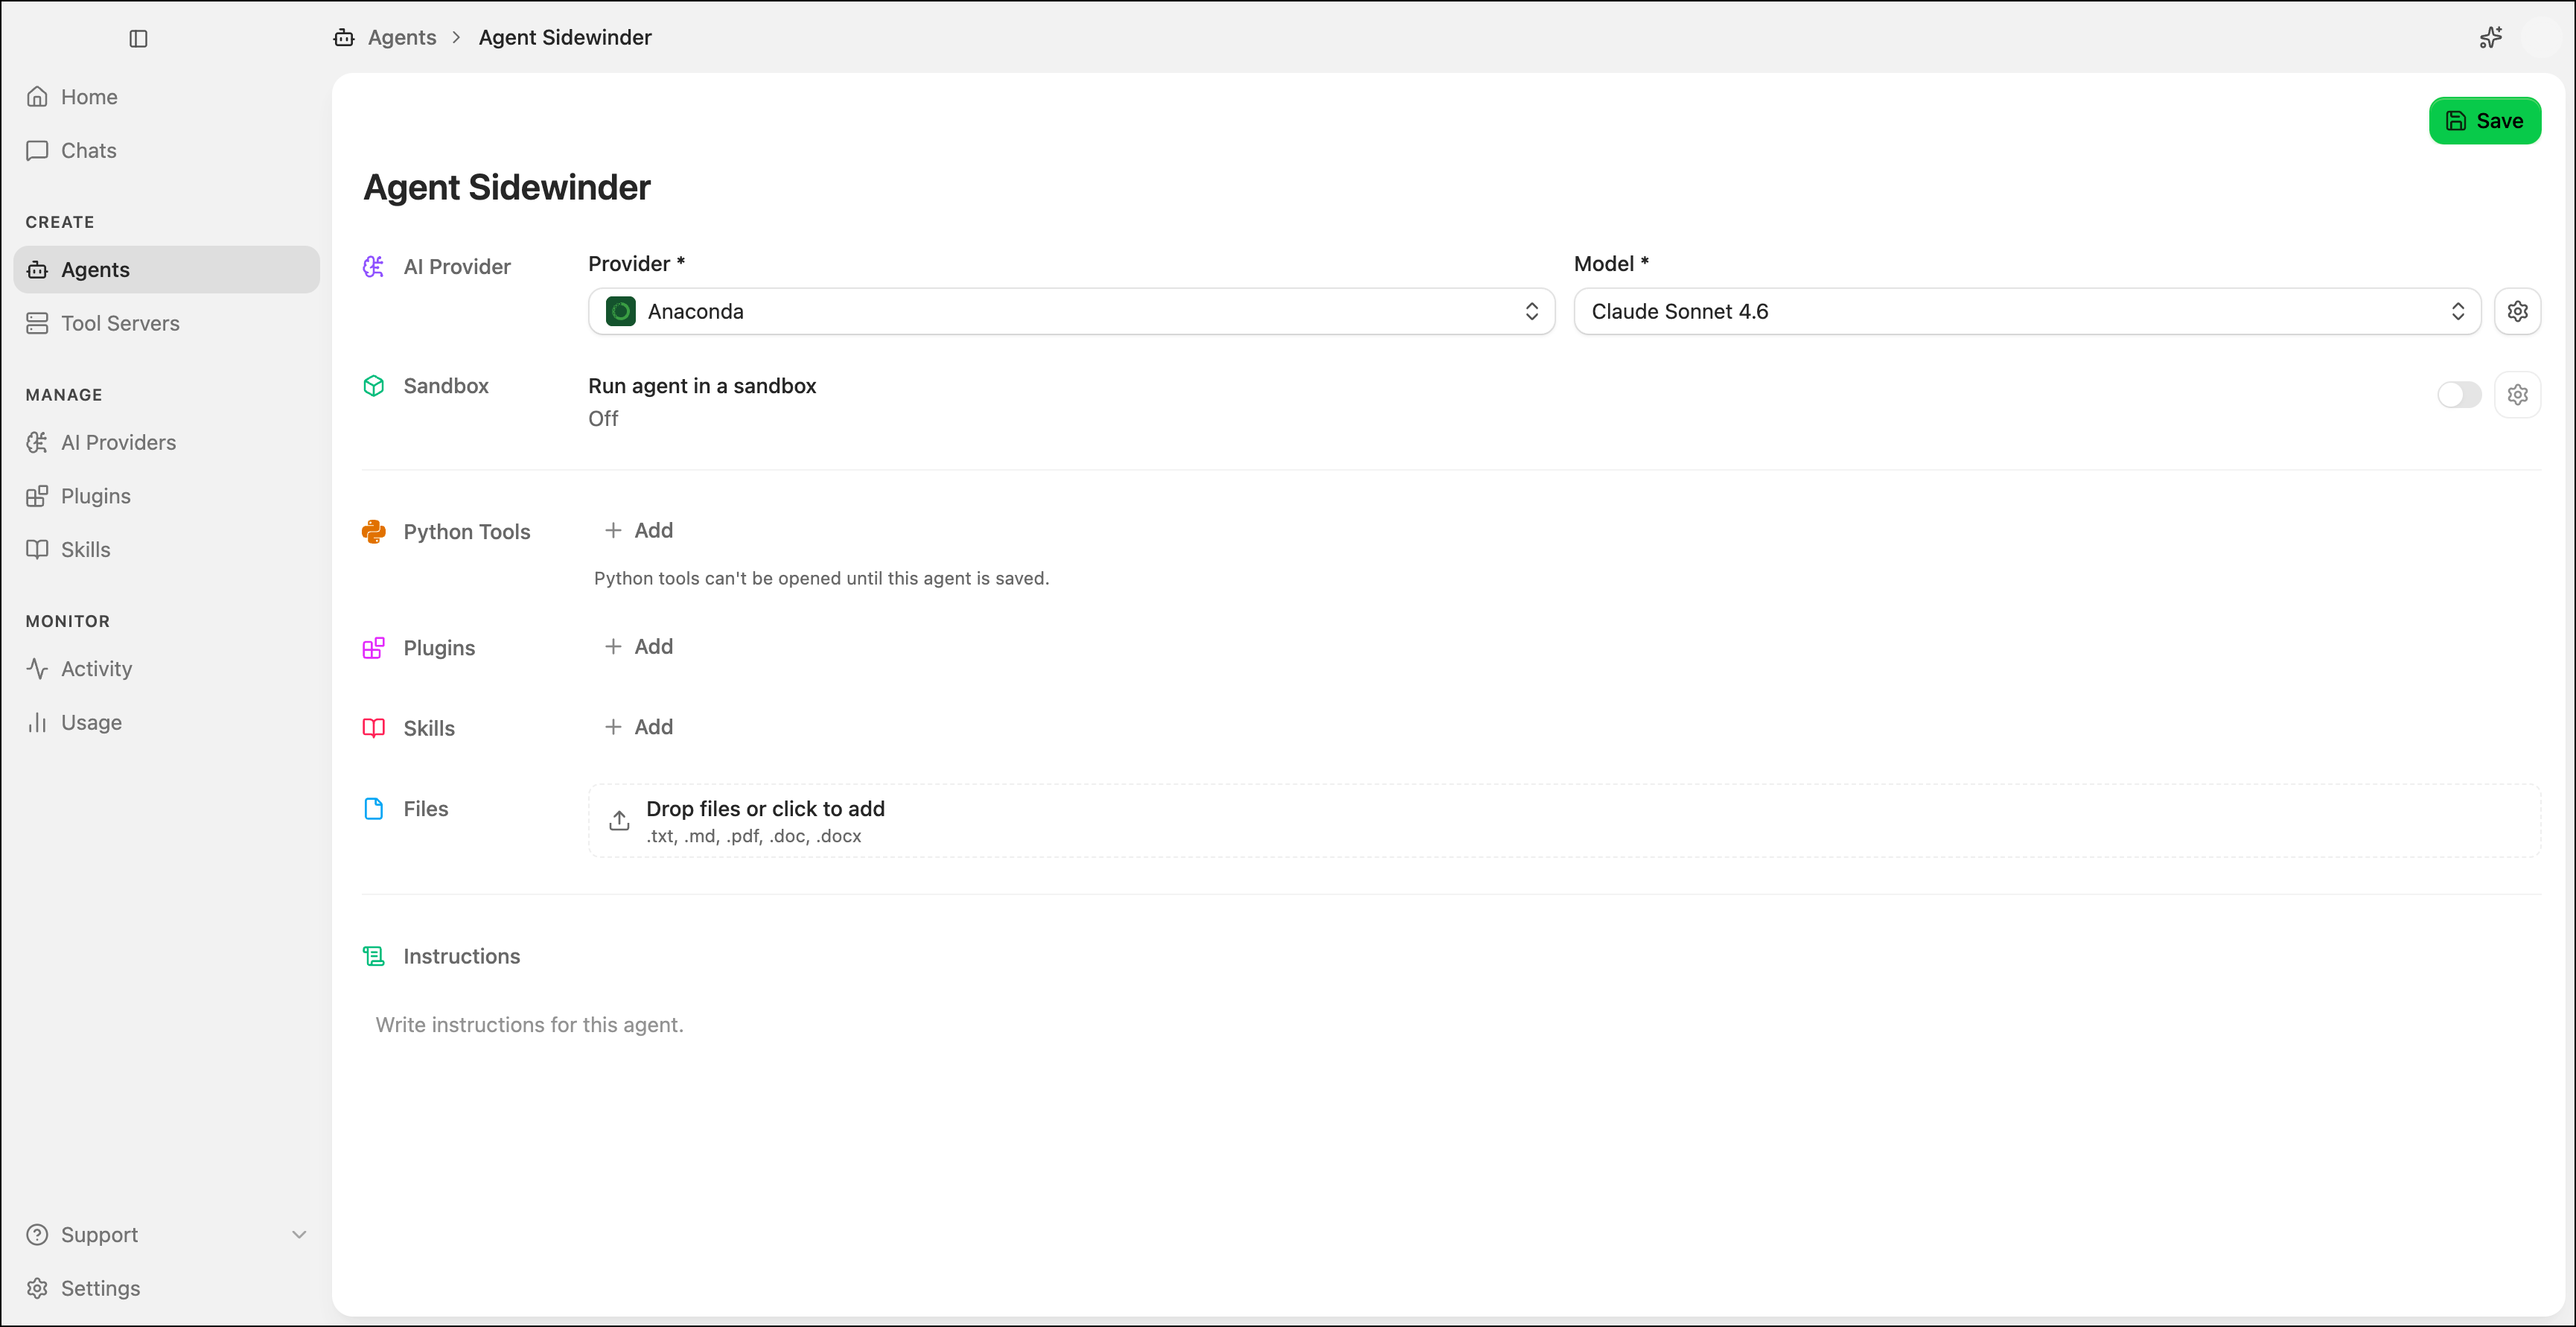
The agent configuration page displays all components that define your agent's behavior. Select an agent's card from the **Agents** page to view its configuration.
1. Select **Agents** from the left-hand navigation.
2. Click **Create**.
3. Click **Blank agent** at the bottom.
4. Enter a **Name** for your agent.
5. Select an **AI Provider** and **Model**.
6. Click **Create Agent**.
The Anaconda Assistant is available from the **Home** page, or by selecting in the upper-right corner of any page.
Describe the agent you want to create and the assistant handles the rest. Detailed requests that include your agent's purpose and intended behavior can result in a fully configured agent, including its system prompt, AI provider, and tools.
The agent's configuration page opens automatically after creation.
## Configuring your agent
The agent configuration page displays all components that define your agent's behavior. Select an agent's card from the **Agents** page to view its configuration.
 ### AI provider
The **AI Provider** row configures which model powers your agent and how it generates responses.
To configure your agent's AI provider:
1. Select an AI provider from the **Provider** dropdown. For more information, see [AI providers](/docs/anaconda-desktop/agent-studio/ai-providers).
2. Select a model from the **Model** dropdown.
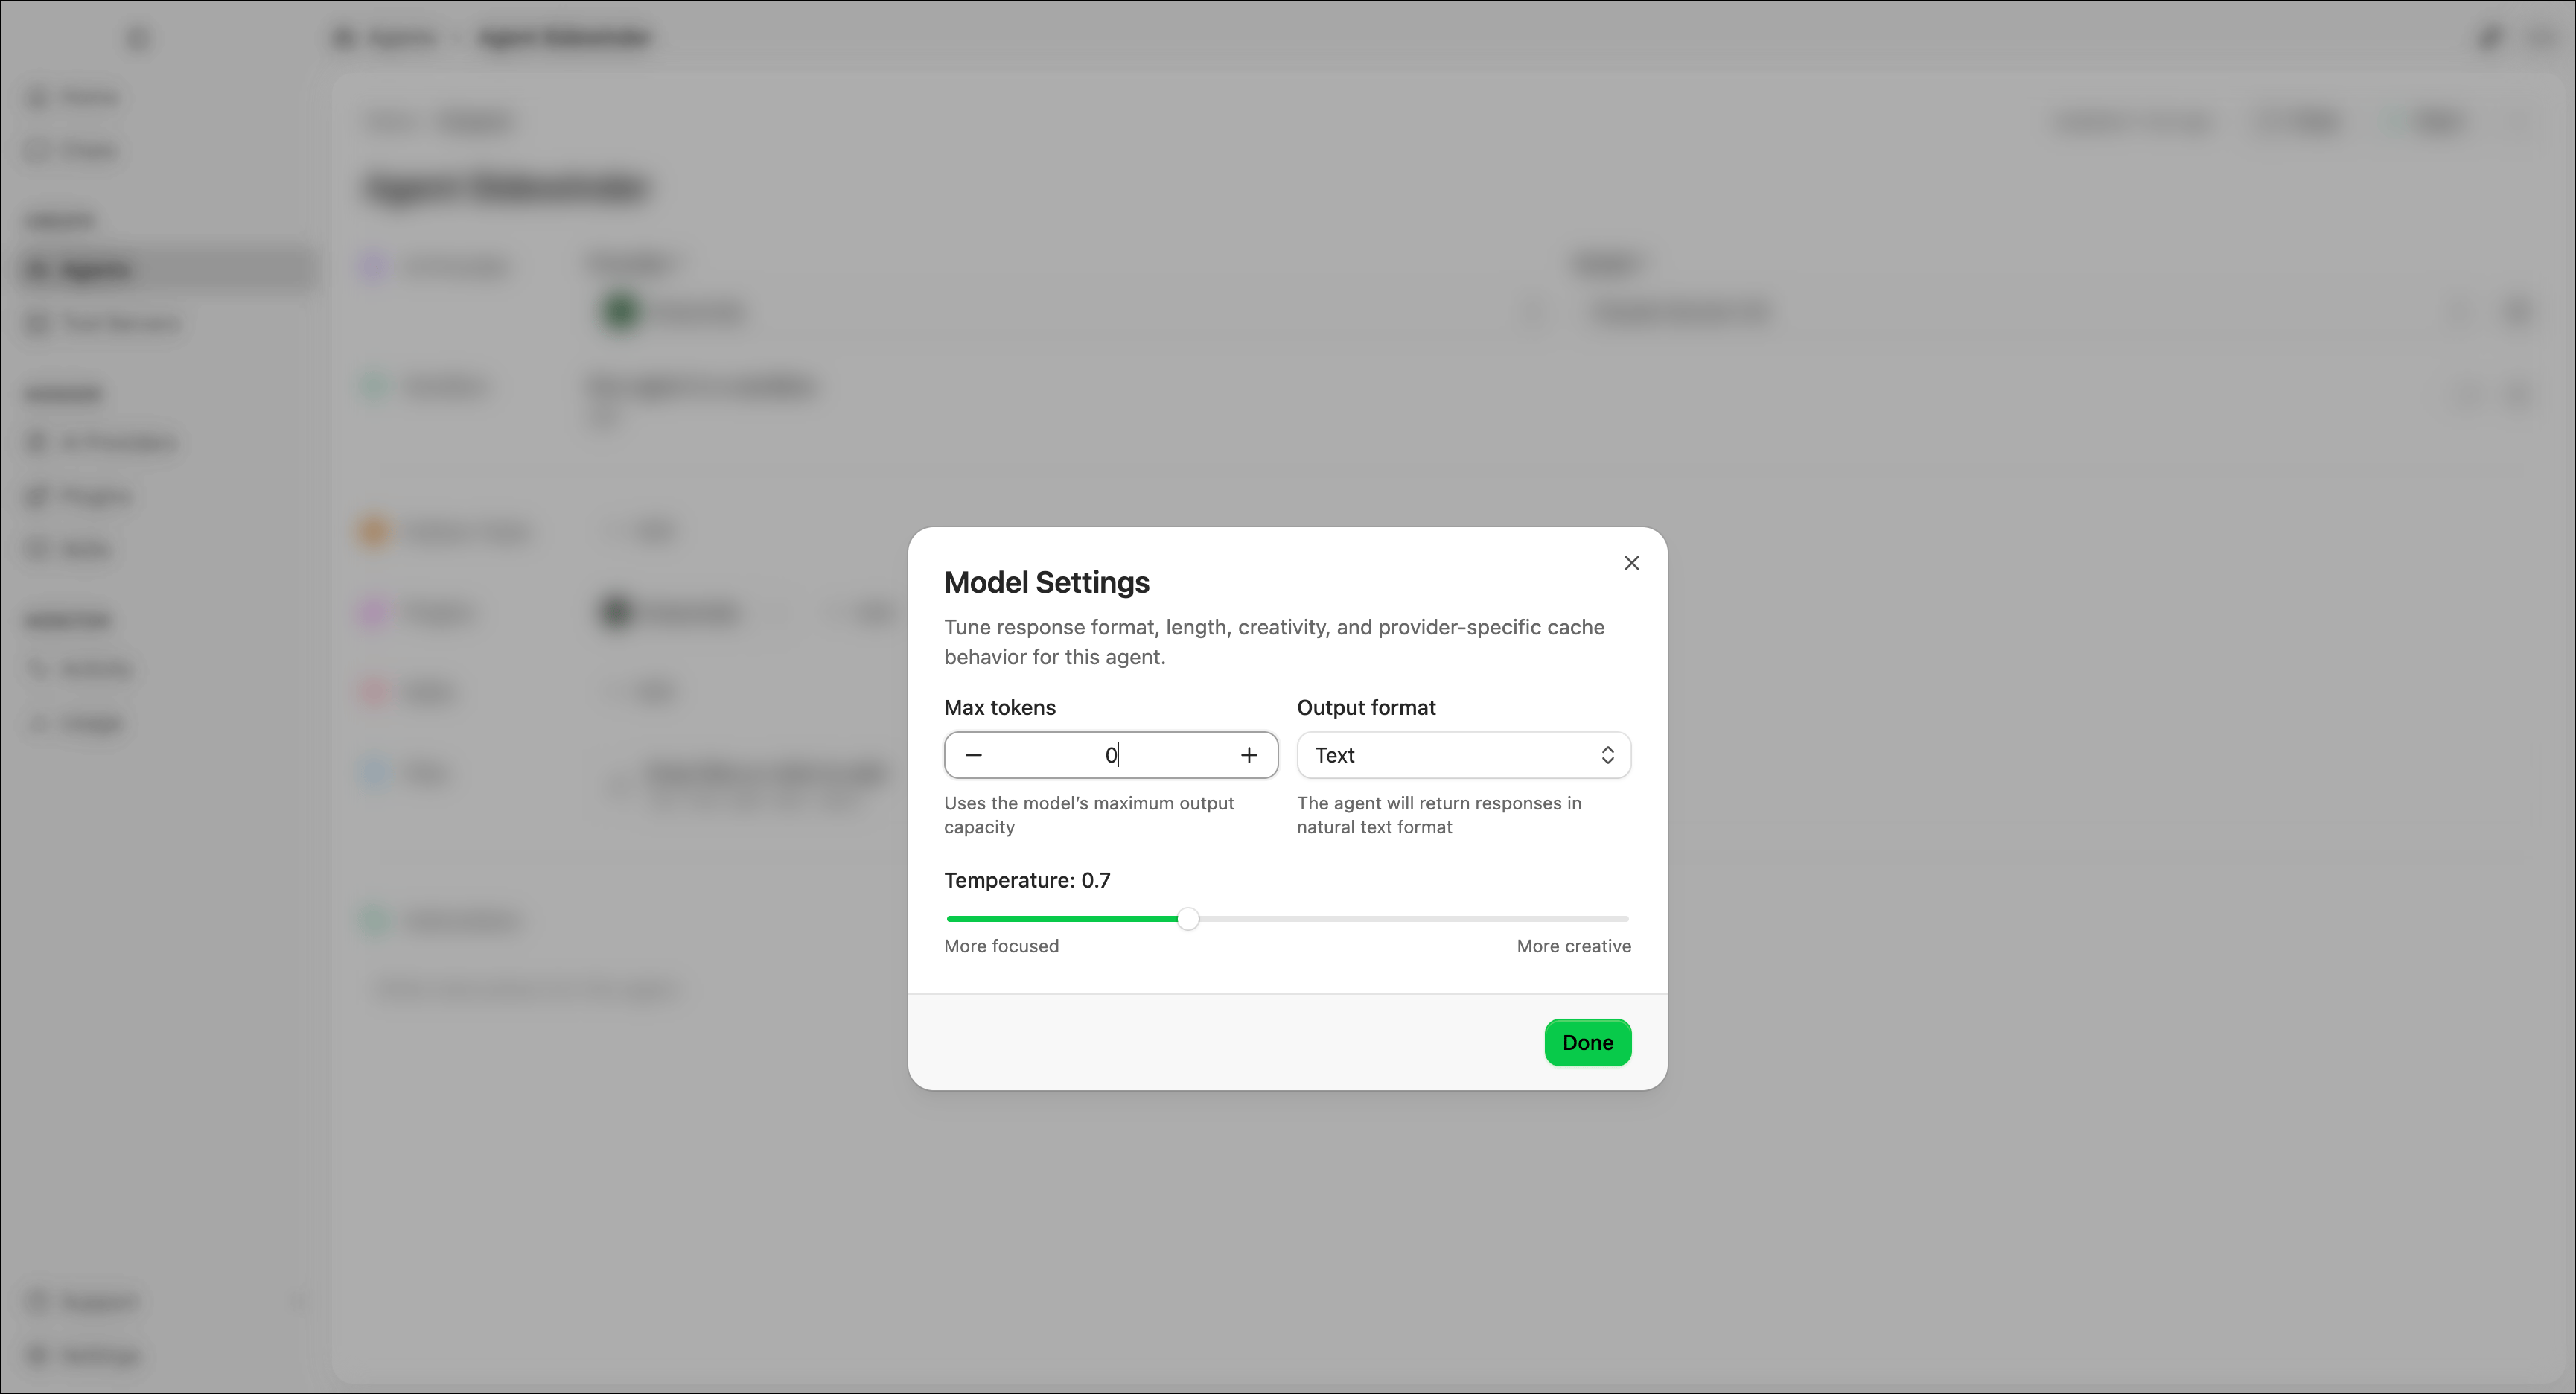
3. Click the settings icon beside the **Model** dropdown to open the Model Settings dialog and adjust the following configurations as needed:
* **Max tokens**: The maximum number of tokens the model can generate in a single response. Leave blank to use the model's maximum output length.
* **Output format**: Choose between **Text** (default) and **JSON** for structured output.
* **Temperature**: Controls randomness in responses. Ranges from 0 (most deterministic) to 2 (most creative).
Lower values work well for analytical tasks; higher values suit more creative tasks.
4. Click **Done**.
### AI provider
The **AI Provider** row configures which model powers your agent and how it generates responses.
To configure your agent's AI provider:
1. Select an AI provider from the **Provider** dropdown. For more information, see [AI providers](/docs/anaconda-desktop/agent-studio/ai-providers).
2. Select a model from the **Model** dropdown.
3. Click the settings icon beside the **Model** dropdown to open the Model Settings dialog and adjust the following configurations as needed:
* **Max tokens**: The maximum number of tokens the model can generate in a single response. Leave blank to use the model's maximum output length.
* **Output format**: Choose between **Text** (default) and **JSON** for structured output.
* **Temperature**: Controls randomness in responses. Ranges from 0 (most deterministic) to 2 (most creative).
Lower values work well for analytical tasks; higher values suit more creative tasks.
4. Click **Done**.
 ### Sandbox
The sandbox runs your agent inside a Docker container, isolating it from your local system. The agent cannot access your filesystem or network unless you explicitly configure folder mounts and networking.
Running an agent in a sandbox requires Docker Desktop installed on your machine.
To configure the sandbox:
1. Turn on the **Sandbox** toggle.
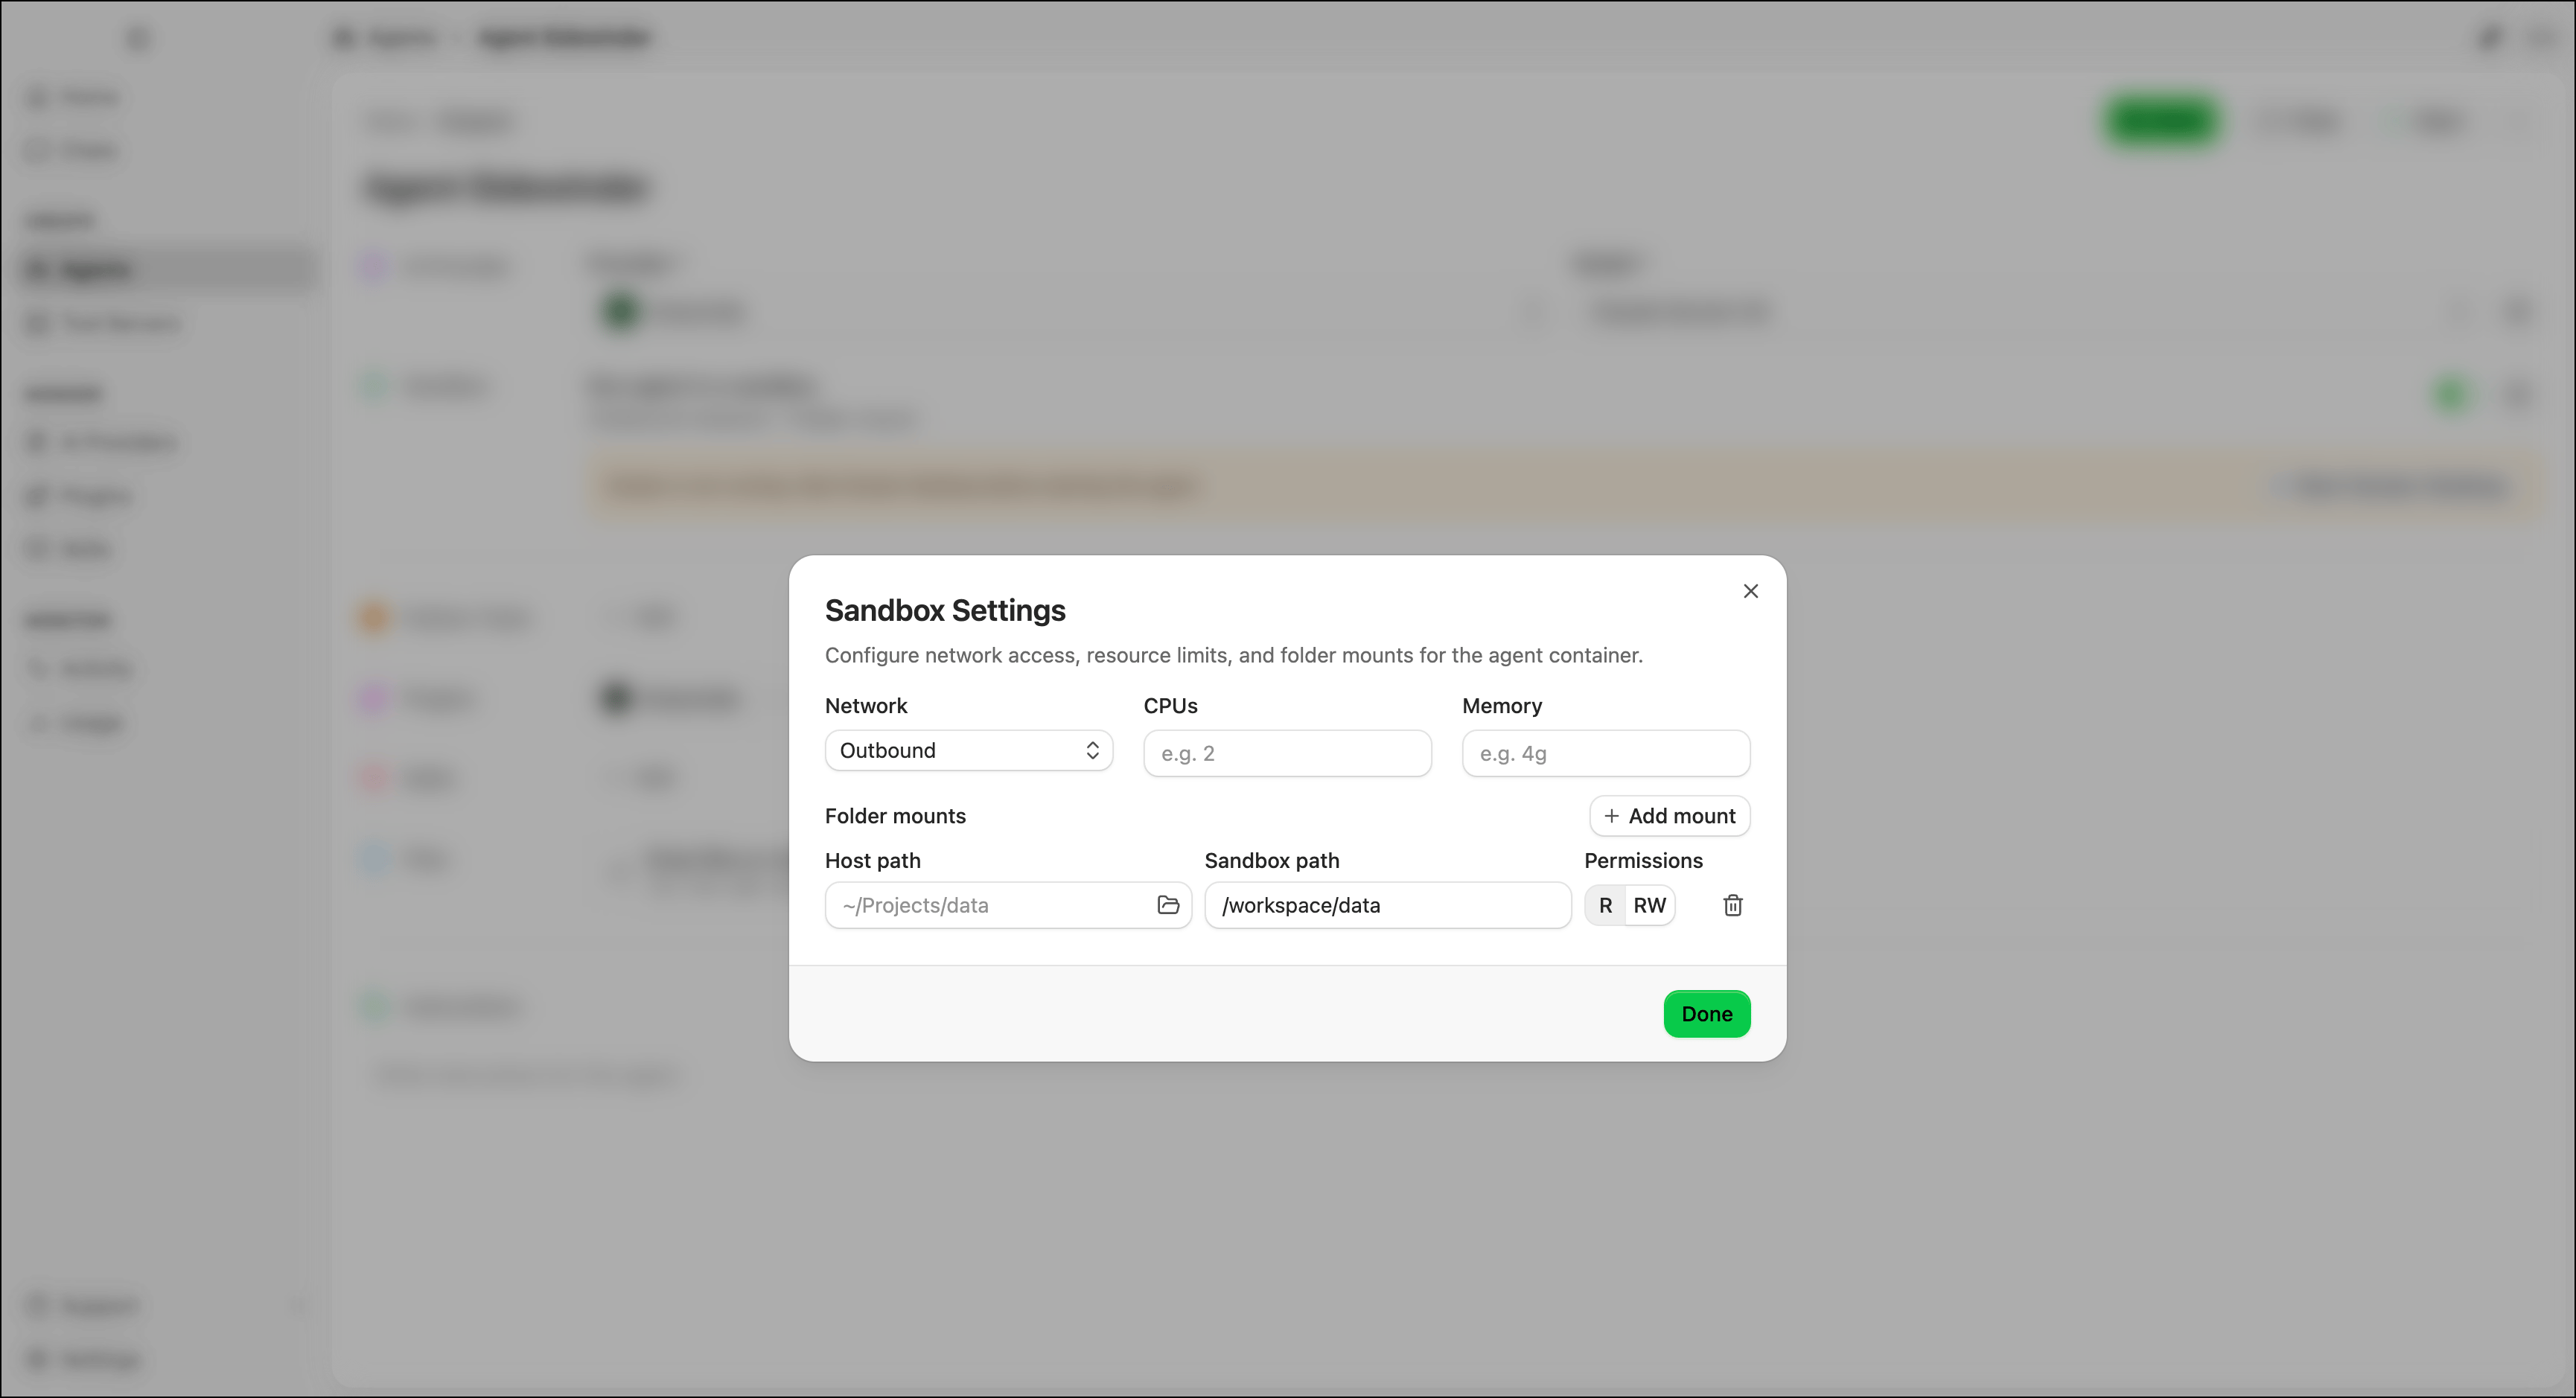
2. Click the settings icon beside the Sandbox toggle to open the Sandbox Settings dialog and adjust the following configurations as needed.
3. Select a network mode from the **Network** dropdown:
* **Outbound** (default): The agent can make outgoing network requests. Agent Studio publishes the container's port to localhost so you can chat with it.
* **Isolated**: No network access. The agent cannot reach external services or be reached from the host.
* **Host network**: The agent shares the host's network namespace directly.
4. (Optional) Set **CPUs** and **Memory** limits for the container.
5. (Optional) Add folder mounts to give the agent access to specific directories on your machine. Click **Add mount**, then configure:
* **Host path**: The directory on your machine to share with the container. Click the folder icon to browse your file system.
* **Sandbox path**: The location inside the container where the directory is mounted.
* **Permissions**: Choose **R** (Read-only) or **RW** (Read/write).
To remove a folder mount, click **Remove**.
6. Repeat the previous step to add as many folder mounts as your agent requires.
7. Click **Done**.
### Sandbox
The sandbox runs your agent inside a Docker container, isolating it from your local system. The agent cannot access your filesystem or network unless you explicitly configure folder mounts and networking.
Running an agent in a sandbox requires Docker Desktop installed on your machine.
To configure the sandbox:
1. Turn on the **Sandbox** toggle.
2. Click the settings icon beside the Sandbox toggle to open the Sandbox Settings dialog and adjust the following configurations as needed.
3. Select a network mode from the **Network** dropdown:
* **Outbound** (default): The agent can make outgoing network requests. Agent Studio publishes the container's port to localhost so you can chat with it.
* **Isolated**: No network access. The agent cannot reach external services or be reached from the host.
* **Host network**: The agent shares the host's network namespace directly.
4. (Optional) Set **CPUs** and **Memory** limits for the container.
5. (Optional) Add folder mounts to give the agent access to specific directories on your machine. Click **Add mount**, then configure:
* **Host path**: The directory on your machine to share with the container. Click the folder icon to browse your file system.
* **Sandbox path**: The location inside the container where the directory is mounted.
* **Permissions**: Choose **R** (Read-only) or **RW** (Read/write).
To remove a folder mount, click **Remove**.
6. Repeat the previous step to add as many folder mounts as your agent requires.
7. Click **Done**.
 When you start an agent with sandbox enabled, Agent Studio builds a container image (indicated by a "building" status) and then launches the agent inside it. The image is cached and only rebuilt when your agent's dependencies change.
If your agent uses MCP servers configured with `127.0.0.1` or `localhost` URLs, those addresses will not resolve inside the container. Use `host.docker.internal` instead to reach services running on your host machine.
### Python tools
Python tools are custom functions that your agent can call during a conversation. Tools are organized into Python files, which group related `@tool` functions. For example, you might create a file called `data_tools.py` that contains functions for querying a database and formatting results.
#### Creating a Python tool file
1. Click **Add** beside **Python Tools**.
2. In the Create File dialog, enter a name using letters, numbers, and underscores. The name must start with a letter or underscore.
3. Click **Create**.
Agent Studio opens your default editor and creates the file with a sample tool function:
```python expandable theme={null}
"""my_tool tool module."""
from anaconda_agent_runtime.tools import tool
@tool
def my_tool(query: str) -> str:
"""Describe what this tool does.
Args:
query: The input to process.
Returns:
The result of the operation.
"""
return f"Result for: {query}"
```
4. Customize the generated function with your tool's logic.
5. Save the file.
The file uses the function name as the tool name; argument names and type hints to build the tool's input schema; and the docstring as the tool's description.
Write a clear docstring that describes what the tool does, what it accepts, and what it returns.
To remove a Python tool, click , then click **Delete** to delete the file.
#### Adding dependencies
If your tools require external packages, open the agent's project folder and edit `pixi.toml` to add dependencies. Click **Open** from the agent configuration page to open the folder in your file system or an external editor.
Add packages under the appropriate section:
```toml theme={null}
[dependencies]
numpy = "*" # conda
[pypi-dependencies]
requests = "*" # PyPI
```
#### Tool approval controls
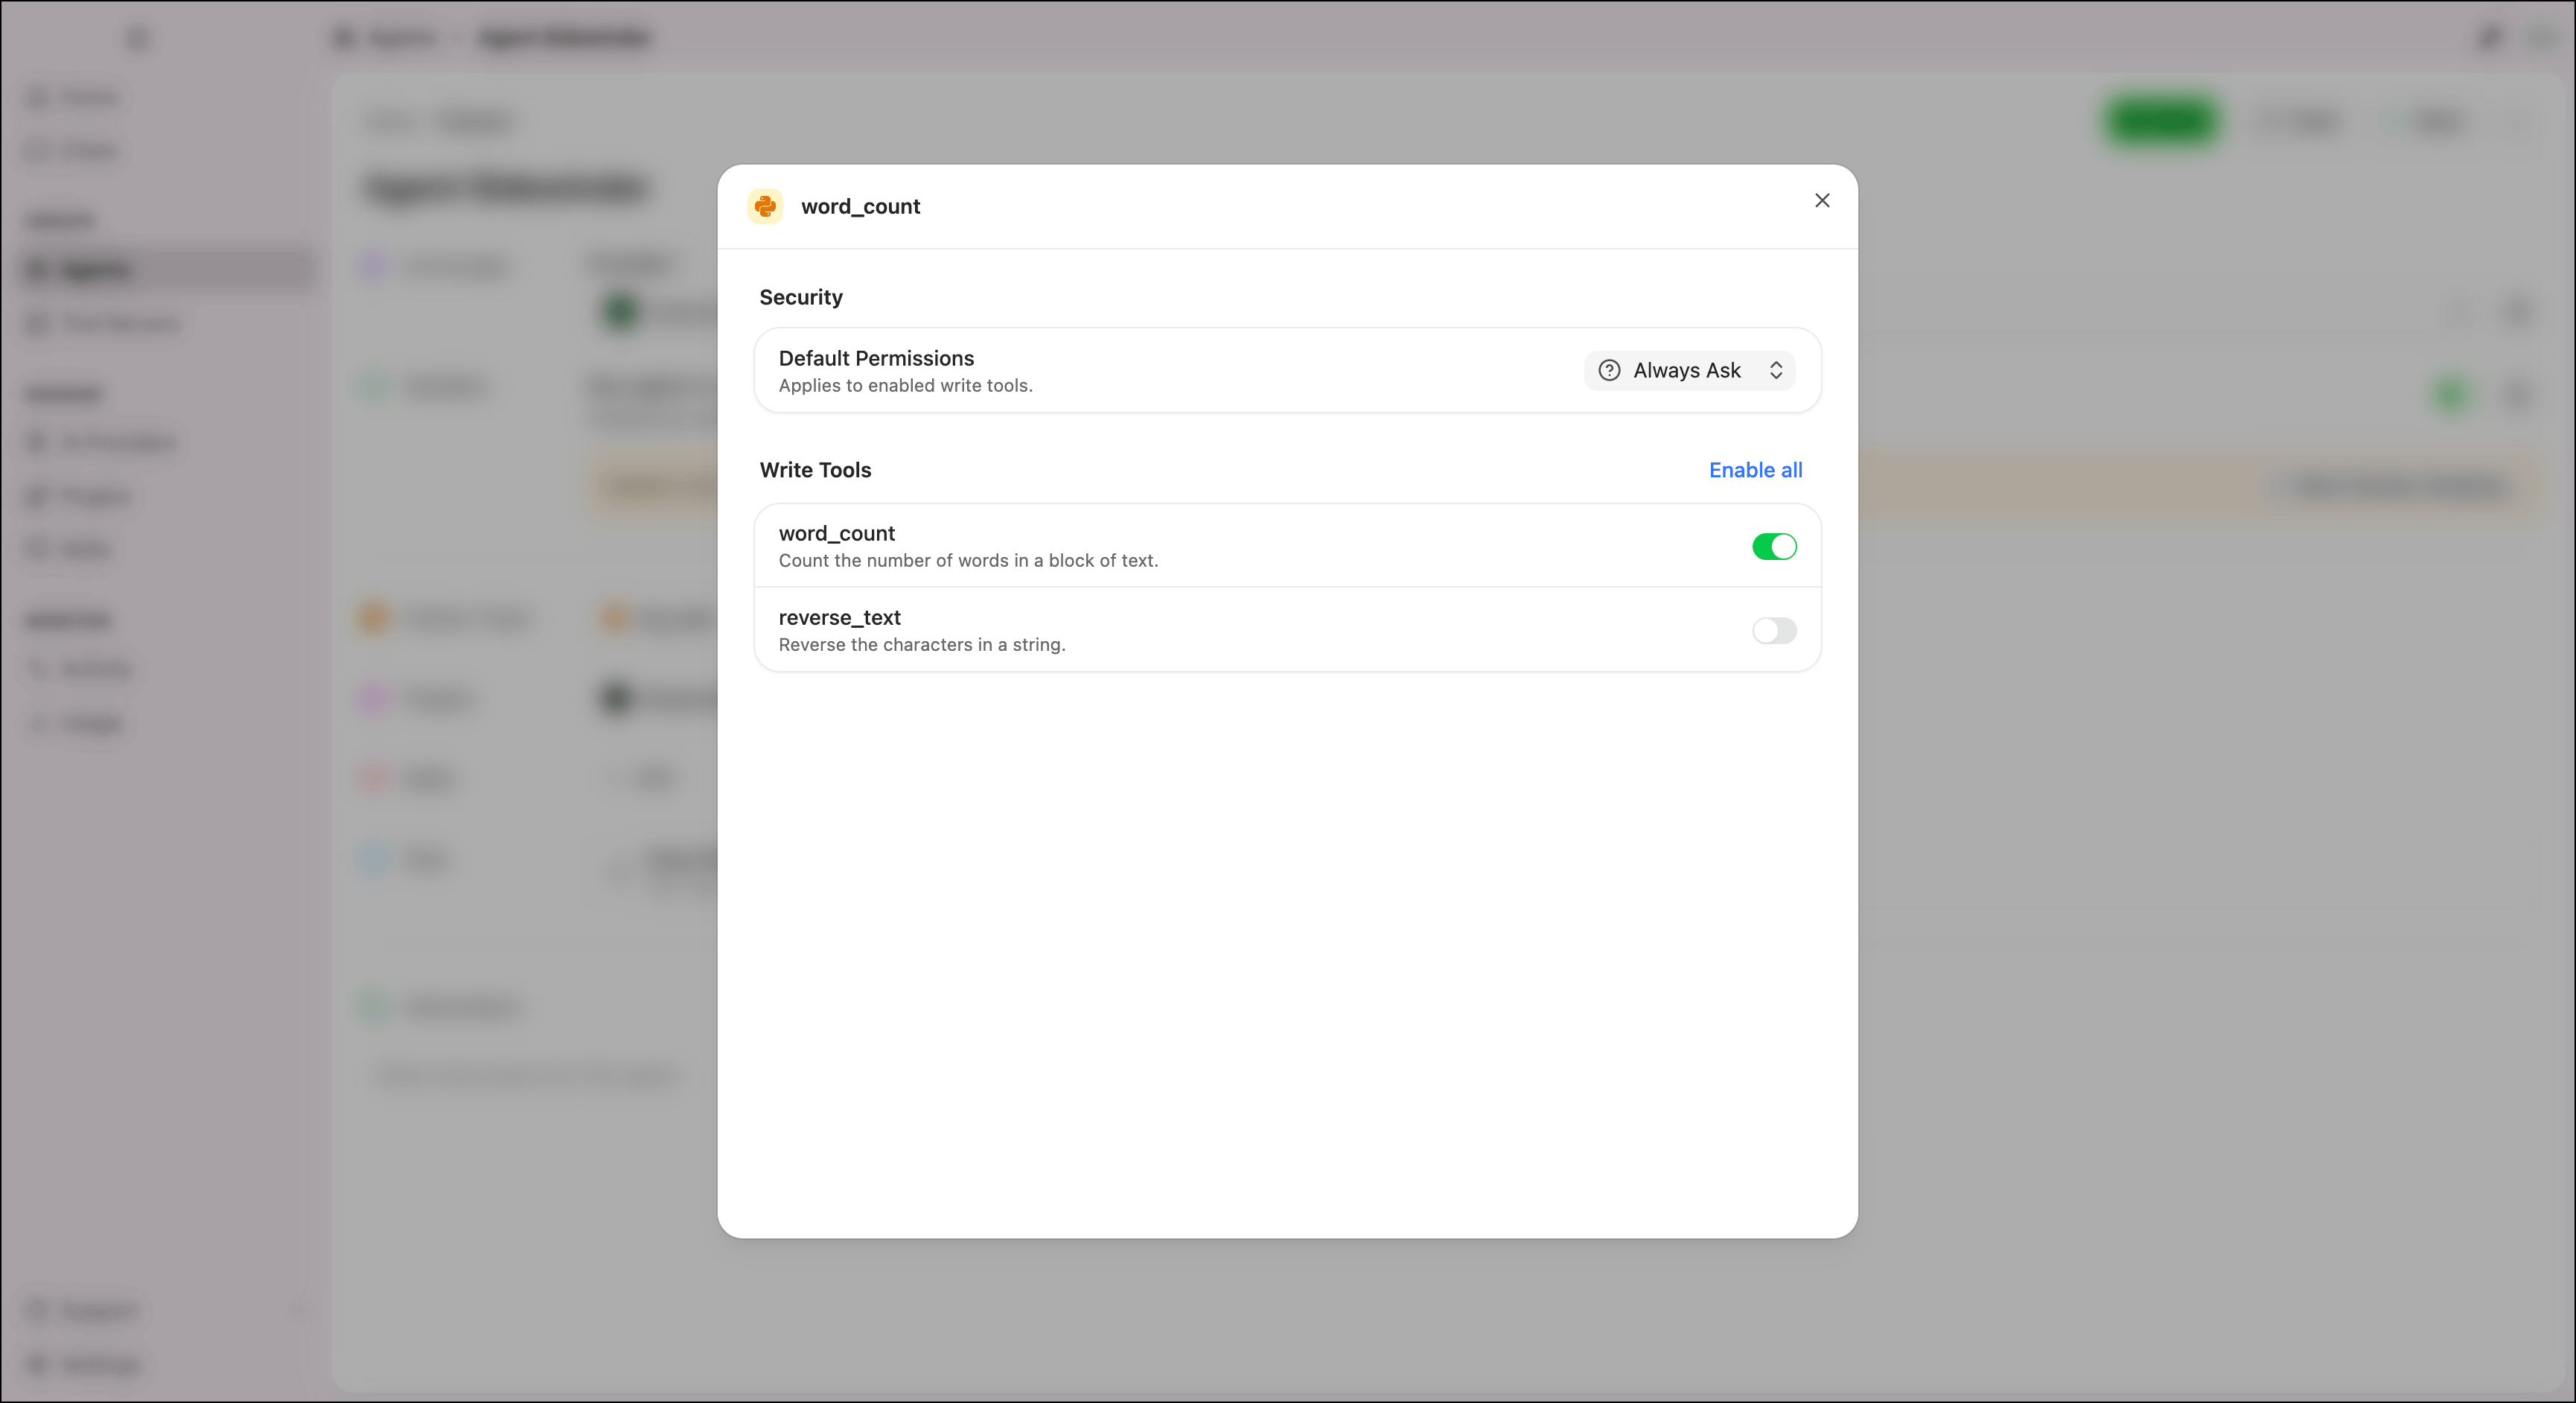
Each Python tool file has an **Edit Tool Policy** dialog with two security settings:
* **Default Permissions**: Controls the approval behavior for all enabled write tools in the file.
* **Write Tools**: Lists the individual `@tool` functions in the file. Turn on the toggle beside each function to enable it as a write tool.
To configure a tool file's approval controls:
1. Click beside the tool file's name, then click **Edit Tool Policy**.
2. Under **Security**, select a **Default Permissions** setting:
* **Always Allow**: The agent can call enabled write tools without asking for permission.
* **Always Ask**: The agent requests approval before calling any enabled write tool.
* **Custom**: Set a permission for each write tool individually.
3. Under **Write Tools**, turn on the toggle beside each `@tool` function you want to enable as a write tool.
When you start an agent with sandbox enabled, Agent Studio builds a container image (indicated by a "building" status) and then launches the agent inside it. The image is cached and only rebuilt when your agent's dependencies change.
If your agent uses MCP servers configured with `127.0.0.1` or `localhost` URLs, those addresses will not resolve inside the container. Use `host.docker.internal` instead to reach services running on your host machine.
### Python tools
Python tools are custom functions that your agent can call during a conversation. Tools are organized into Python files, which group related `@tool` functions. For example, you might create a file called `data_tools.py` that contains functions for querying a database and formatting results.
#### Creating a Python tool file
1. Click **Add** beside **Python Tools**.
2. In the Create File dialog, enter a name using letters, numbers, and underscores. The name must start with a letter or underscore.
3. Click **Create**.
Agent Studio opens your default editor and creates the file with a sample tool function:
```python expandable theme={null}
"""my_tool tool module."""
from anaconda_agent_runtime.tools import tool
@tool
def my_tool(query: str) -> str:
"""Describe what this tool does.
Args:
query: The input to process.
Returns:
The result of the operation.
"""
return f"Result for: {query}"
```
4. Customize the generated function with your tool's logic.
5. Save the file.
The file uses the function name as the tool name; argument names and type hints to build the tool's input schema; and the docstring as the tool's description.
Write a clear docstring that describes what the tool does, what it accepts, and what it returns.
To remove a Python tool, click , then click **Delete** to delete the file.
#### Adding dependencies
If your tools require external packages, open the agent's project folder and edit `pixi.toml` to add dependencies. Click **Open** from the agent configuration page to open the folder in your file system or an external editor.
Add packages under the appropriate section:
```toml theme={null}
[dependencies]
numpy = "*" # conda
[pypi-dependencies]
requests = "*" # PyPI
```
#### Tool approval controls
Each Python tool file has an **Edit Tool Policy** dialog with two security settings:
* **Default Permissions**: Controls the approval behavior for all enabled write tools in the file.
* **Write Tools**: Lists the individual `@tool` functions in the file. Turn on the toggle beside each function to enable it as a write tool.
To configure a tool file's approval controls:
1. Click beside the tool file's name, then click **Edit Tool Policy**.
2. Under **Security**, select a **Default Permissions** setting:
* **Always Allow**: The agent can call enabled write tools without asking for permission.
* **Always Ask**: The agent requests approval before calling any enabled write tool.
* **Custom**: Set a permission for each write tool individually.
3. Under **Write Tools**, turn on the toggle beside each `@tool` function you want to enable as a write tool.
 ### Plugins
Plugins are MCP tools and skills for a specific application that are bundled together. Adding a plugin to an agent provides that application's bundled MCP tools and skills to it for use.
Agent Studio ships with the following plugins:
* **Anaconda**: Connect to conda environment and package management capabilities and Anaconda documentation.
* **nteract**: Work with Jupyter notebooks through MCP, including creating, running, and managing cells and kernels.
* **Jupyter**: Inspect notebook files, list kernels, connect to notebooks, run notebook workflows, and work with Jupyter context.
* **Atlassian**: Access Jira and Confluence for ticket management, sprint tracking, and documentation.
* **Miro**: Create and edit content on Miro boards, including sticky notes, flows, and diagrams.
* **Omni Analytics**: Query data using natural language through Omni's governed semantic model.
* **Ramp**: Enable secure, read-only access to Ramp data for customer-defined logic.
* **GitHub**: Create and review pull requests, manage issues, trigger and monitor Actions runs, clone repos, and more.
* **Web Search**: Query the web to return titles, URLs, and text content.
To add a plugin:
1. Click **Add** on the **Plugins** row.
2. Select a plugin from the available options.
3. Click **Add to agent**.
To remove a plugin, click beside the plugin, then click **Remove**.
### Skills
Skills give your agent reusable workflows and context for when to use its tools. Before you can enable a skill for an agent, it must be added to Agent Studio. For details on adding skills, see [Skills](/docs/anaconda-desktop/agent-studio/skills).
To enable a skill for your agent:
1. Click **Add** on the **Skills** row.
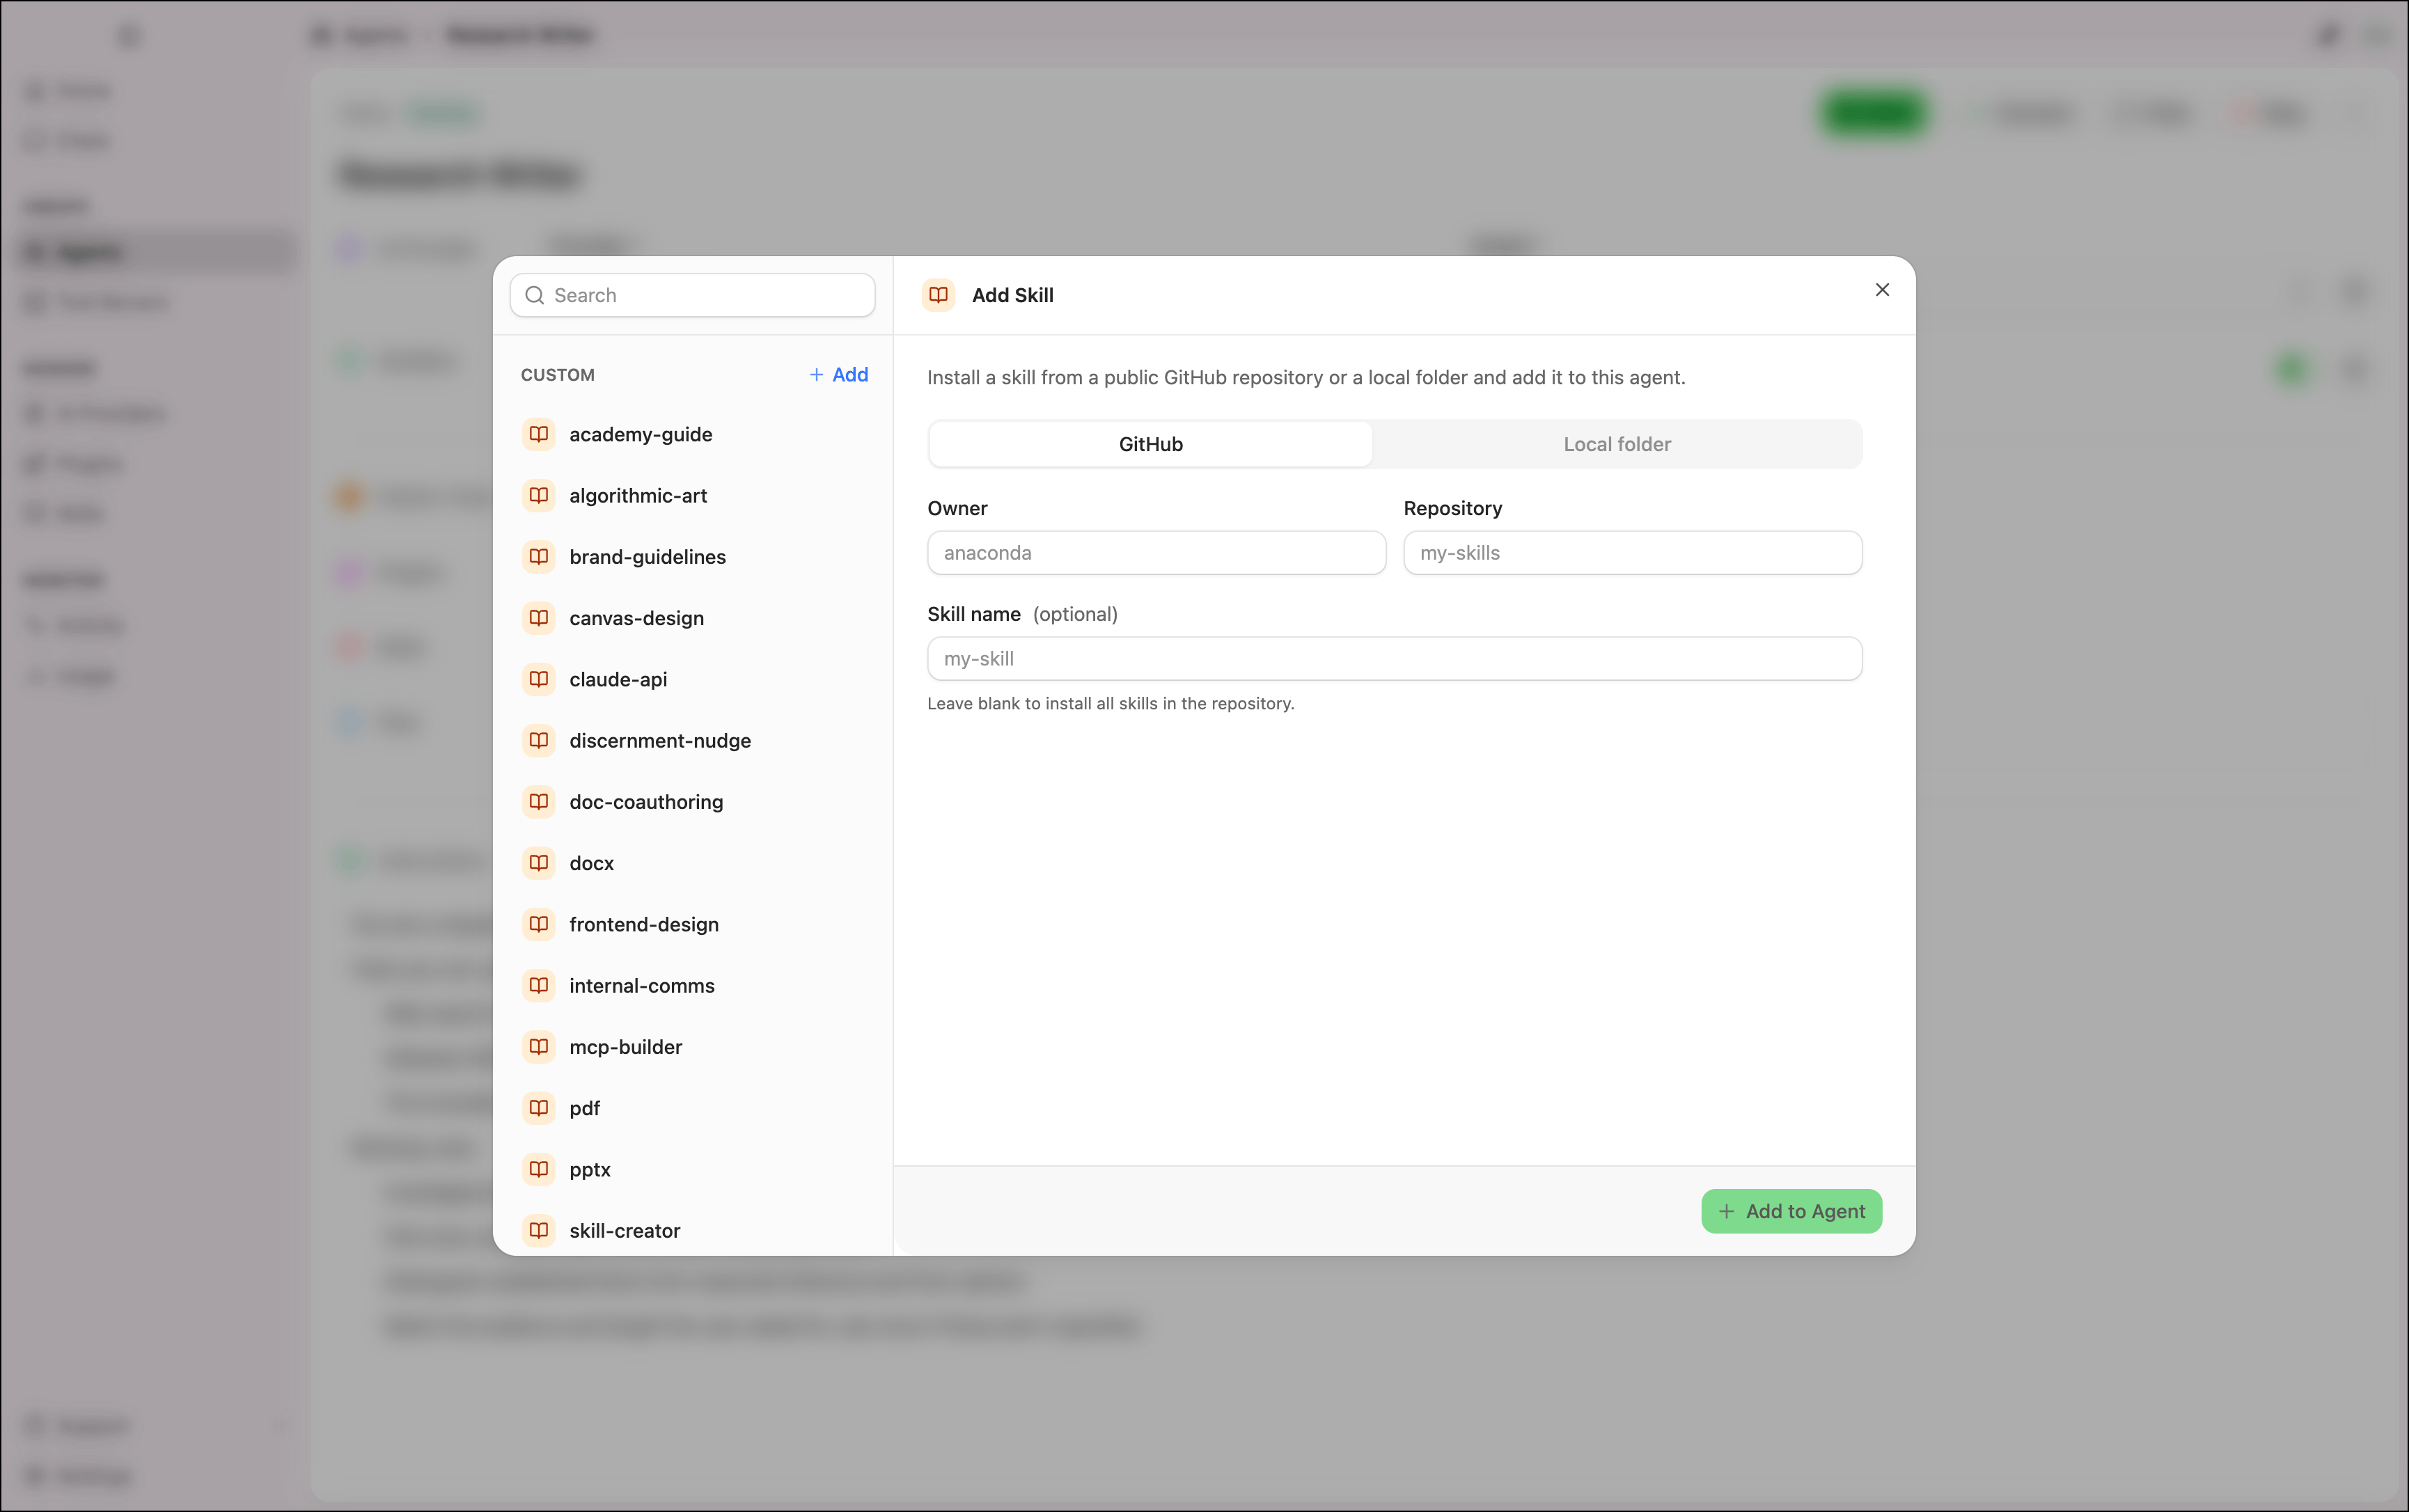
2. Click **Add** to open the Add Skill dialog.
3. Choose a source and configure the skill:
Add a skill from a public GitHub repository.
1. Enter the repository **Owner** and **Repository** name.
2. (Optional) Enter a **Skill name** to add a specific skill from the repository. Leave this field blank to add all skills in the repository.
3. Click **Add**.
### Plugins
Plugins are MCP tools and skills for a specific application that are bundled together. Adding a plugin to an agent provides that application's bundled MCP tools and skills to it for use.
Agent Studio ships with the following plugins:
* **Anaconda**: Connect to conda environment and package management capabilities and Anaconda documentation.
* **nteract**: Work with Jupyter notebooks through MCP, including creating, running, and managing cells and kernels.
* **Jupyter**: Inspect notebook files, list kernels, connect to notebooks, run notebook workflows, and work with Jupyter context.
* **Atlassian**: Access Jira and Confluence for ticket management, sprint tracking, and documentation.
* **Miro**: Create and edit content on Miro boards, including sticky notes, flows, and diagrams.
* **Omni Analytics**: Query data using natural language through Omni's governed semantic model.
* **Ramp**: Enable secure, read-only access to Ramp data for customer-defined logic.
* **GitHub**: Create and review pull requests, manage issues, trigger and monitor Actions runs, clone repos, and more.
* **Web Search**: Query the web to return titles, URLs, and text content.
To add a plugin:
1. Click **Add** on the **Plugins** row.
2. Select a plugin from the available options.
3. Click **Add to agent**.
To remove a plugin, click beside the plugin, then click **Remove**.
### Skills
Skills give your agent reusable workflows and context for when to use its tools. Before you can enable a skill for an agent, it must be added to Agent Studio. For details on adding skills, see [Skills](/docs/anaconda-desktop/agent-studio/skills).
To enable a skill for your agent:
1. Click **Add** on the **Skills** row.
2. Click **Add** to open the Add Skill dialog.
3. Choose a source and configure the skill:
Add a skill from a public GitHub repository.
1. Enter the repository **Owner** and **Repository** name.
2. (Optional) Enter a **Skill name** to add a specific skill from the repository. Leave this field blank to add all skills in the repository.
3. Click **Add**.
 Add a skill from a folder on your machine.
1. Click **Browse** and select a folder. The folder must contain a `SKILL.md` file, or be a parent folder of skill subfolders to install them all.
2. Click **Add**.
4. Click **Add to Agent**.
Skills included with a plugin are labeled with the plugin name and do not need to be added separately.
To remove a skill, click beside the skill, then click **Remove**.
### Files
Files are reference documents that Agent Studio inserts into the agent's context at the start of each conversation.
Supplying large or numerous files consumes more of the agent's available context window, which can affect response quality. Start with concise, focused documents and adjust based on your results.
To add files, drag and drop them into the **Files** area, or click it to browse your file system.
To remove a file, click beside the file name, then click **Remove**.
Maximum file size is 25 MB.
### Instructions
The Instructions field defines your agent's role, tone, and behavioral guidelines. It also controls when and how the agent uses its tools. Click the **Instructions** field and type directly to add or edit instructions. For guidance on writing effective instructions, see [Crafting effective system prompts](/docs/anaconda-desktop/tutorials/system-prompt).
## Starting and chatting with your agent
Once your agent is configured, you can start it and begin a conversation:
1. From the agent configuration page, click **Start**.
2. Wait for the agent to finish starting. A notification appears when the agent is ready.
3. Click **Chat** to open a conversation with the agent.
To stop a running agent, click **Stop** from the agent configuration page.
You can also click **Chat** on a stopped agent. The agent starts automatically when you send your first message.
If your agent has MCP tools that require authentication, Agent Studio prompts you to authorize access when you start a chat.
***
If your message or the agent's response triggers a safety filter (such as PII detection, secrets detection, or prompt injection protection), Agent Studio blocks the response and displays a "Blocked by safety filter" warning in the chat.
## Monitoring agents
### Activity
The Agent Activity monitor displays a real-time stream of events from your running agents, including tool calls, model requests, and lifecycle changes. Use it to verify that your agent is behaving as expected or to diagnose unexpected behavior.
Click **Activity** to open the monitor page. This view shows events from all running agents.
Add a skill from a folder on your machine.
1. Click **Browse** and select a folder. The folder must contain a `SKILL.md` file, or be a parent folder of skill subfolders to install them all.
2. Click **Add**.
4. Click **Add to Agent**.
Skills included with a plugin are labeled with the plugin name and do not need to be added separately.
To remove a skill, click beside the skill, then click **Remove**.
### Files
Files are reference documents that Agent Studio inserts into the agent's context at the start of each conversation.
Supplying large or numerous files consumes more of the agent's available context window, which can affect response quality. Start with concise, focused documents and adjust based on your results.
To add files, drag and drop them into the **Files** area, or click it to browse your file system.
To remove a file, click beside the file name, then click **Remove**.
Maximum file size is 25 MB.
### Instructions
The Instructions field defines your agent's role, tone, and behavioral guidelines. It also controls when and how the agent uses its tools. Click the **Instructions** field and type directly to add or edit instructions. For guidance on writing effective instructions, see [Crafting effective system prompts](/docs/anaconda-desktop/tutorials/system-prompt).
## Starting and chatting with your agent
Once your agent is configured, you can start it and begin a conversation:
1. From the agent configuration page, click **Start**.
2. Wait for the agent to finish starting. A notification appears when the agent is ready.
3. Click **Chat** to open a conversation with the agent.
To stop a running agent, click **Stop** from the agent configuration page.
You can also click **Chat** on a stopped agent. The agent starts automatically when you send your first message.
If your agent has MCP tools that require authentication, Agent Studio prompts you to authorize access when you start a chat.
***
If your message or the agent's response triggers a safety filter (such as PII detection, secrets detection, or prompt injection protection), Agent Studio blocks the response and displays a "Blocked by safety filter" warning in the chat.
## Monitoring agents
### Activity
The Agent Activity monitor displays a real-time stream of events from your running agents, including tool calls, model requests, and lifecycle changes. Use it to verify that your agent is behaving as expected or to diagnose unexpected behavior.
Click **Activity** to open the monitor page. This view shows events from all running agents.
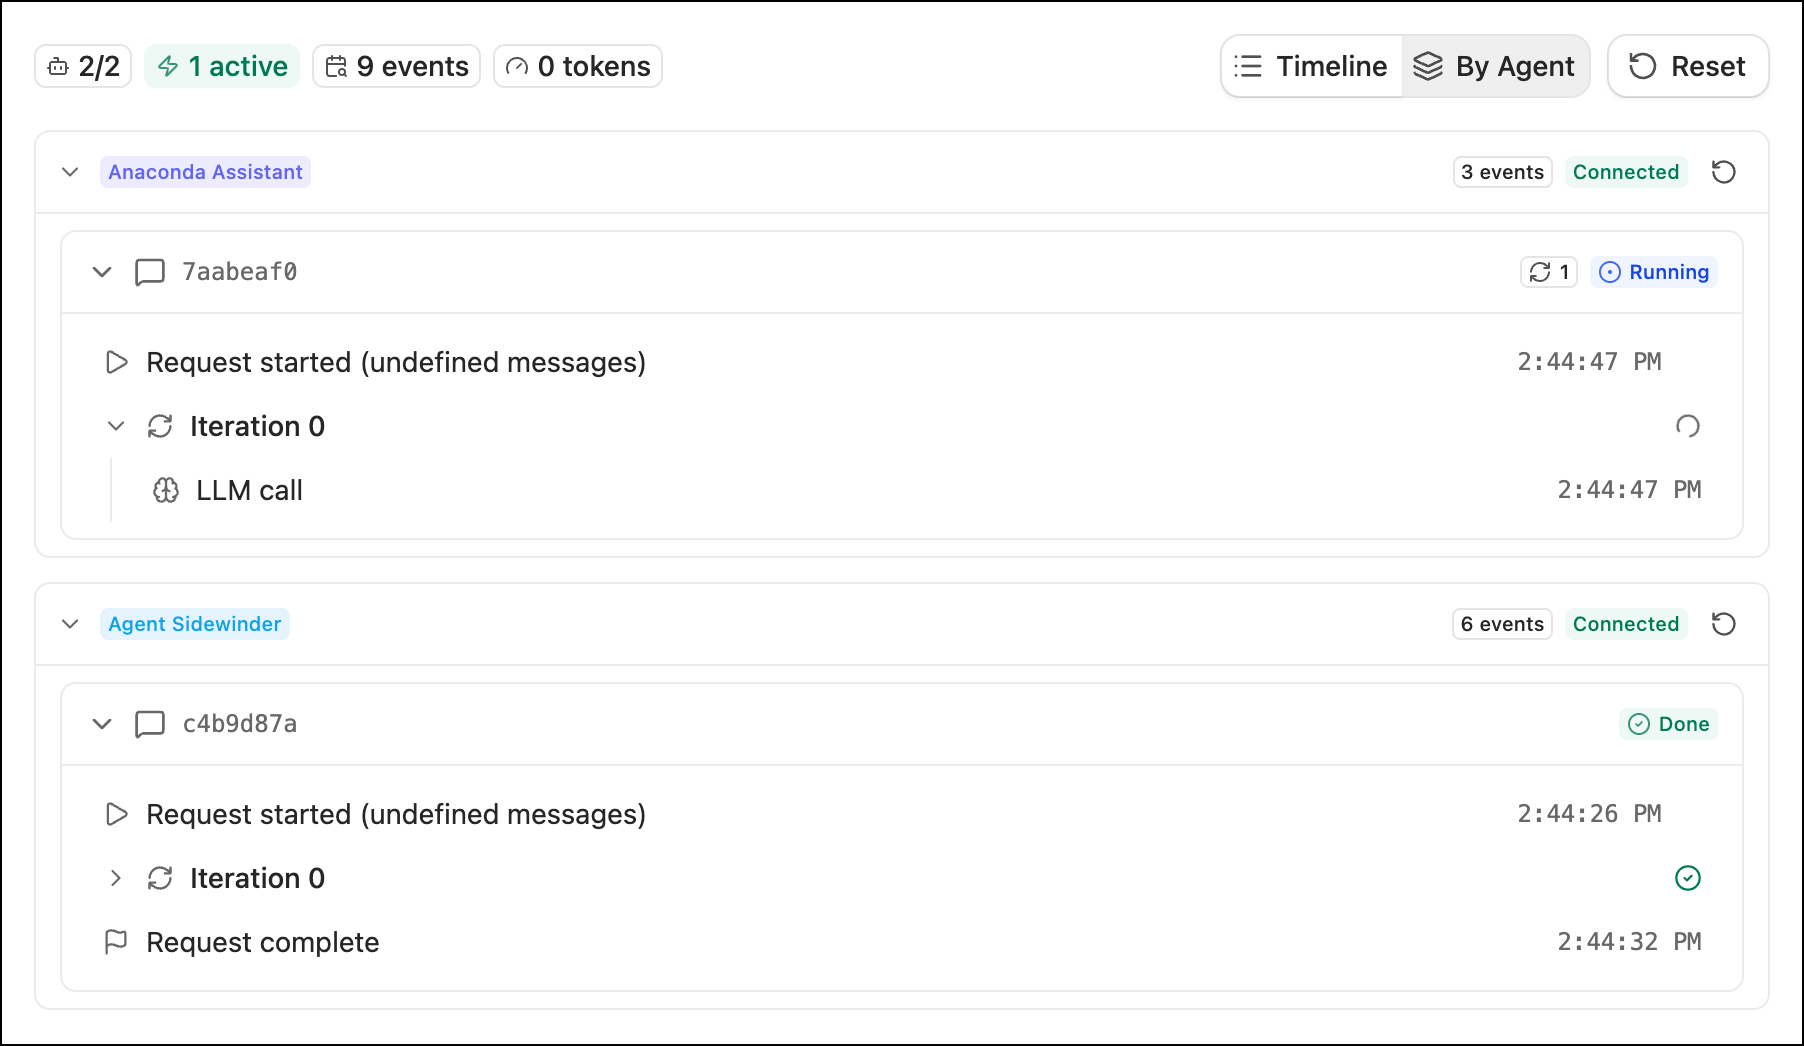 Use the controls in the upper-right corner to change the view:
* **Timeline**: Displays events in chronological order across all agents.
* **By Agent**: Groups events under each agent.
* **Reset**: Clears all recorded events from the monitor.
* **Open in new window**: Opens the monitor page in a dedicated window.
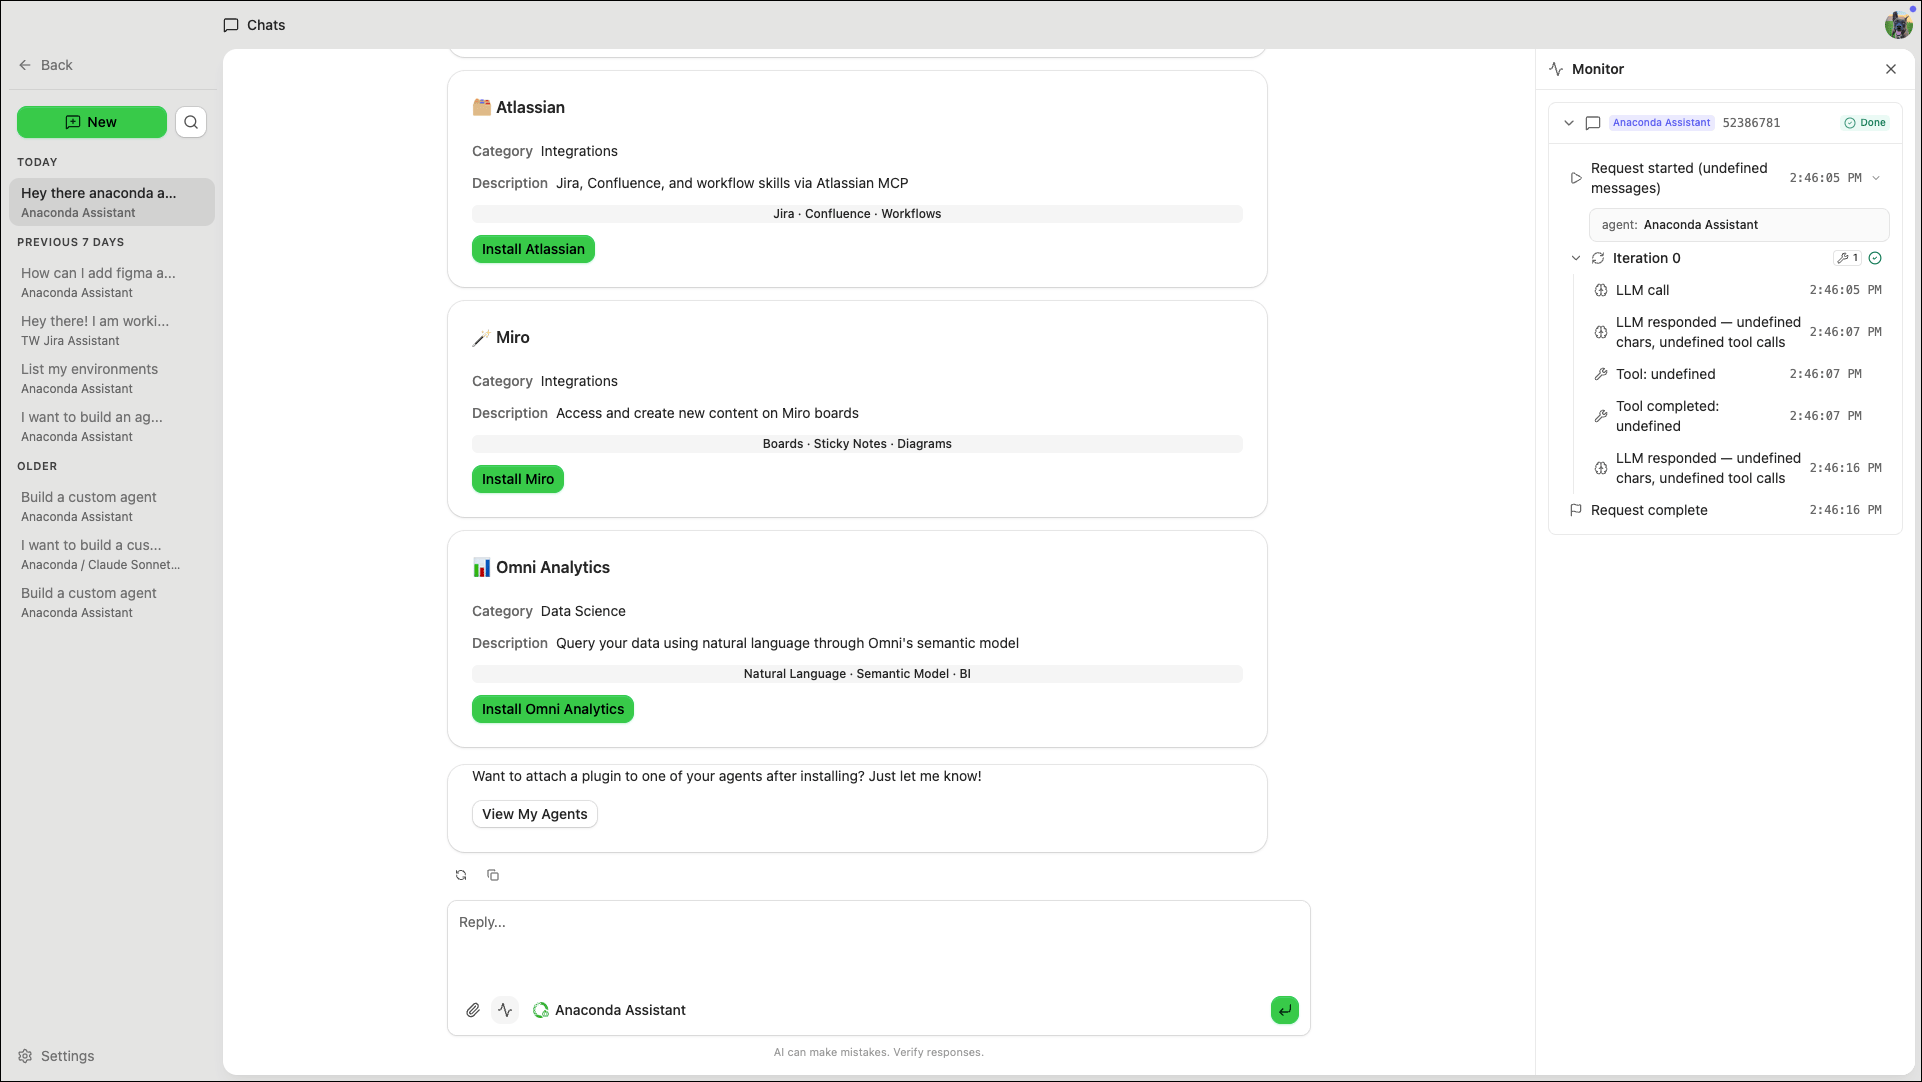
Click **Activity** in the chat window to open a panel on the right side. This view shows events for the current conversation.
Use the controls in the upper-right corner to change the view:
* **Timeline**: Displays events in chronological order across all agents.
* **By Agent**: Groups events under each agent.
* **Reset**: Clears all recorded events from the monitor.
* **Open in new window**: Opens the monitor page in a dedicated window.
Click **Activity** in the chat window to open a panel on the right side. This view shows events for the current conversation.
 ### Usage
The Usage page tracks token consumption and estimated costs across your agent conversations. Estimated costs are calculated from public model pricing tables and stored locally.
Click **Usage** from the left-hand navigation to open the page.
Use the time period buttons in the upper-right corner to filter the data:
* **Today**: Usage from the current day.
* **7 Days**: Rolling 7-day window.
* **30 Days**: Rolling 30-day window.
* **All Time**: All recorded usage.
* **Refresh**: Updates the data to include the most recent usage.
The page displays four summary metrics:
* **Requests**: Total number of model requests sent.
* **Tokens In**: Total input tokens sent to the model.
* **Tokens Out**: Total output tokens returned by the model.
* **Estimated Cost**: Approximate cost based on public pricing for the models used.
The **Breakdown** section lists usage per agent or provider. Select **By Agent** or **By Provider** to switch between views.
## Comparing agents and models
To compare responses from multiple agents or models side by side:
1. Select **Chats** from the left-hand navigation.
2. Click **New**, then click **Compare Chat**.
3. Select the checkbox beside two to four agents or models to compare.
4. Click **Start**.
5. Enter a message. Agent Studio sends it to all selected agents or models simultaneously and displays their responses in side-by-side columns.
Agents or models that require credentials (such as API keys) are unavailable until their provider is configured. See [AI providers](/docs/anaconda-desktop/agent-studio/ai-providers).
## Connecting to your agent
Every running agent exposes connection options for external tools, browser-based chat, and direct HTTP access. Once your agent is running, click **Connect** from the agent configuration page to open the Connect dialog.
### MCP server
The **MCP Server** section connects your agent to external tools that support MCP. Use **Quick Setup** to configure supported tools automatically, or **Custom** to copy the connection details manually.
Turn on the toggle beside each tool to register the agent as an MCP server in that tool's configuration. Supported tools include Claude Desktop, Claude Code, Cursor, OpenCode, and VS Code.
The Custom tab provides two connection options:
Streamable HTTP (recommended)
The agent's MCP endpoint URL, plus a ready-to-paste `mcp.json` entry. Use this for any MCP-compatible client that supports Streamable HTTP, including Claude Code, Cursor, and VS Code.
SSE (Legacy)
The agent's SSE endpoint URL for clients that do not yet support Streamable HTTP.
### Web chat
Click **Open** to open a browser-based chat interface for the agent, or **Copy URL** to share or bookmark the link.
### Advanced endpoints
Expand **Advanced Endpoints** to view the agent's HTTP endpoints for scripting and automation:
Endpoint
Method
Description
**Chat completions**
`POST`
OpenAI-compatible chat endpoint for direct API calls.
**List models**
`GET`
Lists agents as model IDs through the Desktop API server.
**Health check**
`GET`
Returns when the agent's runtime process is up.
**Activity**
`GET`
Streams lifecycle and activity events from this agent.
## Opening agent files
Click in the upper-right corner of the agent's page, then click **Open** to open your agent's project folder in your file system or an external editor like VS Code. The folder contains the agent definition (`agent.yaml`), Python tool modules, skills, and project configuration.
Configure which editors appear in the **Open** menu from the [Settings](/docs/anaconda-desktop/agent-studio/settings#appearance) page.
## Multi-agent orchestration
Every running agent in Agent Studio is exposed as an MCP server on your local machine. Any other agent, whether in Agent Studio or in an external tool like Claude Desktop, Cursor, or VS Code, can connect to it and delegate tasks.
To connect one agent to another:
1. [Start the target agent](#starting-and-chatting-with-your-agent).
2. Click **Connect** from the target agent's configuration page.
3. Copy the streamable HTTP URL from the **Custom** tab in the Connect dialog.
4. In the calling agent's configuration page, click **Add** on the **Plugins** row.
5. Click **Add** beside **Custom**.
6. Give the custom MCP a name and paste the target agent's URL into the **URL** field.
7. Click **Add to agent**.
The calling agent can now send prompts to the target agent through a single MCP tool. The target agent's internal tools and context are not exposed to the caller, so each agent's responsibilities remain separate.
For example, you can create one agent for code review and another for documentation lookup, then connect them both to a coordinator agent.
For more information about creating tool-only services that agents can connect to, see [Creating a tool server](/docs/anaconda-desktop/agent-studio/tool-servers).
## Deleting an agent
1. Select **Agents** from the left-hand navigation.
2. Click on the agent's card.
3. Select **Delete** to remove the agent.
Deleting an agent removes its configuration, documents, and tools. This action cannot be undone.
***
The Anaconda Assistant agent cannot be deleted.
### Usage
The Usage page tracks token consumption and estimated costs across your agent conversations. Estimated costs are calculated from public model pricing tables and stored locally.
Click **Usage** from the left-hand navigation to open the page.
Use the time period buttons in the upper-right corner to filter the data:
* **Today**: Usage from the current day.
* **7 Days**: Rolling 7-day window.
* **30 Days**: Rolling 30-day window.
* **All Time**: All recorded usage.
* **Refresh**: Updates the data to include the most recent usage.
The page displays four summary metrics:
* **Requests**: Total number of model requests sent.
* **Tokens In**: Total input tokens sent to the model.
* **Tokens Out**: Total output tokens returned by the model.
* **Estimated Cost**: Approximate cost based on public pricing for the models used.
The **Breakdown** section lists usage per agent or provider. Select **By Agent** or **By Provider** to switch between views.
## Comparing agents and models
To compare responses from multiple agents or models side by side:
1. Select **Chats** from the left-hand navigation.
2. Click **New**, then click **Compare Chat**.
3. Select the checkbox beside two to four agents or models to compare.
4. Click **Start**.
5. Enter a message. Agent Studio sends it to all selected agents or models simultaneously and displays their responses in side-by-side columns.
Agents or models that require credentials (such as API keys) are unavailable until their provider is configured. See [AI providers](/docs/anaconda-desktop/agent-studio/ai-providers).
## Connecting to your agent
Every running agent exposes connection options for external tools, browser-based chat, and direct HTTP access. Once your agent is running, click **Connect** from the agent configuration page to open the Connect dialog.
### MCP server
The **MCP Server** section connects your agent to external tools that support MCP. Use **Quick Setup** to configure supported tools automatically, or **Custom** to copy the connection details manually.
Turn on the toggle beside each tool to register the agent as an MCP server in that tool's configuration. Supported tools include Claude Desktop, Claude Code, Cursor, OpenCode, and VS Code.
The Custom tab provides two connection options:
Streamable HTTP (recommended)
The agent's MCP endpoint URL, plus a ready-to-paste `mcp.json` entry. Use this for any MCP-compatible client that supports Streamable HTTP, including Claude Code, Cursor, and VS Code.
SSE (Legacy)
The agent's SSE endpoint URL for clients that do not yet support Streamable HTTP.
### Web chat
Click **Open** to open a browser-based chat interface for the agent, or **Copy URL** to share or bookmark the link.
### Advanced endpoints
Expand **Advanced Endpoints** to view the agent's HTTP endpoints for scripting and automation:
Endpoint
Method
Description
**Chat completions**
`POST`
OpenAI-compatible chat endpoint for direct API calls.
**List models**
`GET`
Lists agents as model IDs through the Desktop API server.
**Health check**
`GET`
Returns when the agent's runtime process is up.
**Activity**
`GET`
Streams lifecycle and activity events from this agent.
## Opening agent files
Click in the upper-right corner of the agent's page, then click **Open** to open your agent's project folder in your file system or an external editor like VS Code. The folder contains the agent definition (`agent.yaml`), Python tool modules, skills, and project configuration.
Configure which editors appear in the **Open** menu from the [Settings](/docs/anaconda-desktop/agent-studio/settings#appearance) page.
## Multi-agent orchestration
Every running agent in Agent Studio is exposed as an MCP server on your local machine. Any other agent, whether in Agent Studio or in an external tool like Claude Desktop, Cursor, or VS Code, can connect to it and delegate tasks.
To connect one agent to another:
1. [Start the target agent](#starting-and-chatting-with-your-agent).
2. Click **Connect** from the target agent's configuration page.
3. Copy the streamable HTTP URL from the **Custom** tab in the Connect dialog.
4. In the calling agent's configuration page, click **Add** on the **Plugins** row.
5. Click **Add** beside **Custom**.
6. Give the custom MCP a name and paste the target agent's URL into the **URL** field.
7. Click **Add to agent**.
The calling agent can now send prompts to the target agent through a single MCP tool. The target agent's internal tools and context are not exposed to the caller, so each agent's responsibilities remain separate.
For example, you can create one agent for code review and another for documentation lookup, then connect them both to a coordinator agent.
For more information about creating tool-only services that agents can connect to, see [Creating a tool server](/docs/anaconda-desktop/agent-studio/tool-servers).
## Deleting an agent
1. Select **Agents** from the left-hand navigation.
2. Click on the agent's card.
3. Select **Delete** to remove the agent.
Deleting an agent removes its configuration, documents, and tools. This action cannot be undone.
***
The Anaconda Assistant agent cannot be deleted.