> ## Documentation Index
> Fetch the complete documentation index at: https://anaconda.com/docs/llms.txt
> Use this file to discover all available pages before exploring further.
# Artifact detail pages
export const DefinitionDescription = ({children}) => {children};
export const DefinitionTerm = ({children}) => {children};
export const DefinitionList = ({children}) => {children}
;
Every package, environment, and model on Anaconda.org has a detail page with in-depth information. You can reach a detail page by selecting a card from the [search results](/docs/anaconda-org/searching), clicking an artifact name anywhere it appears on the site, or navigating directly to its URL.
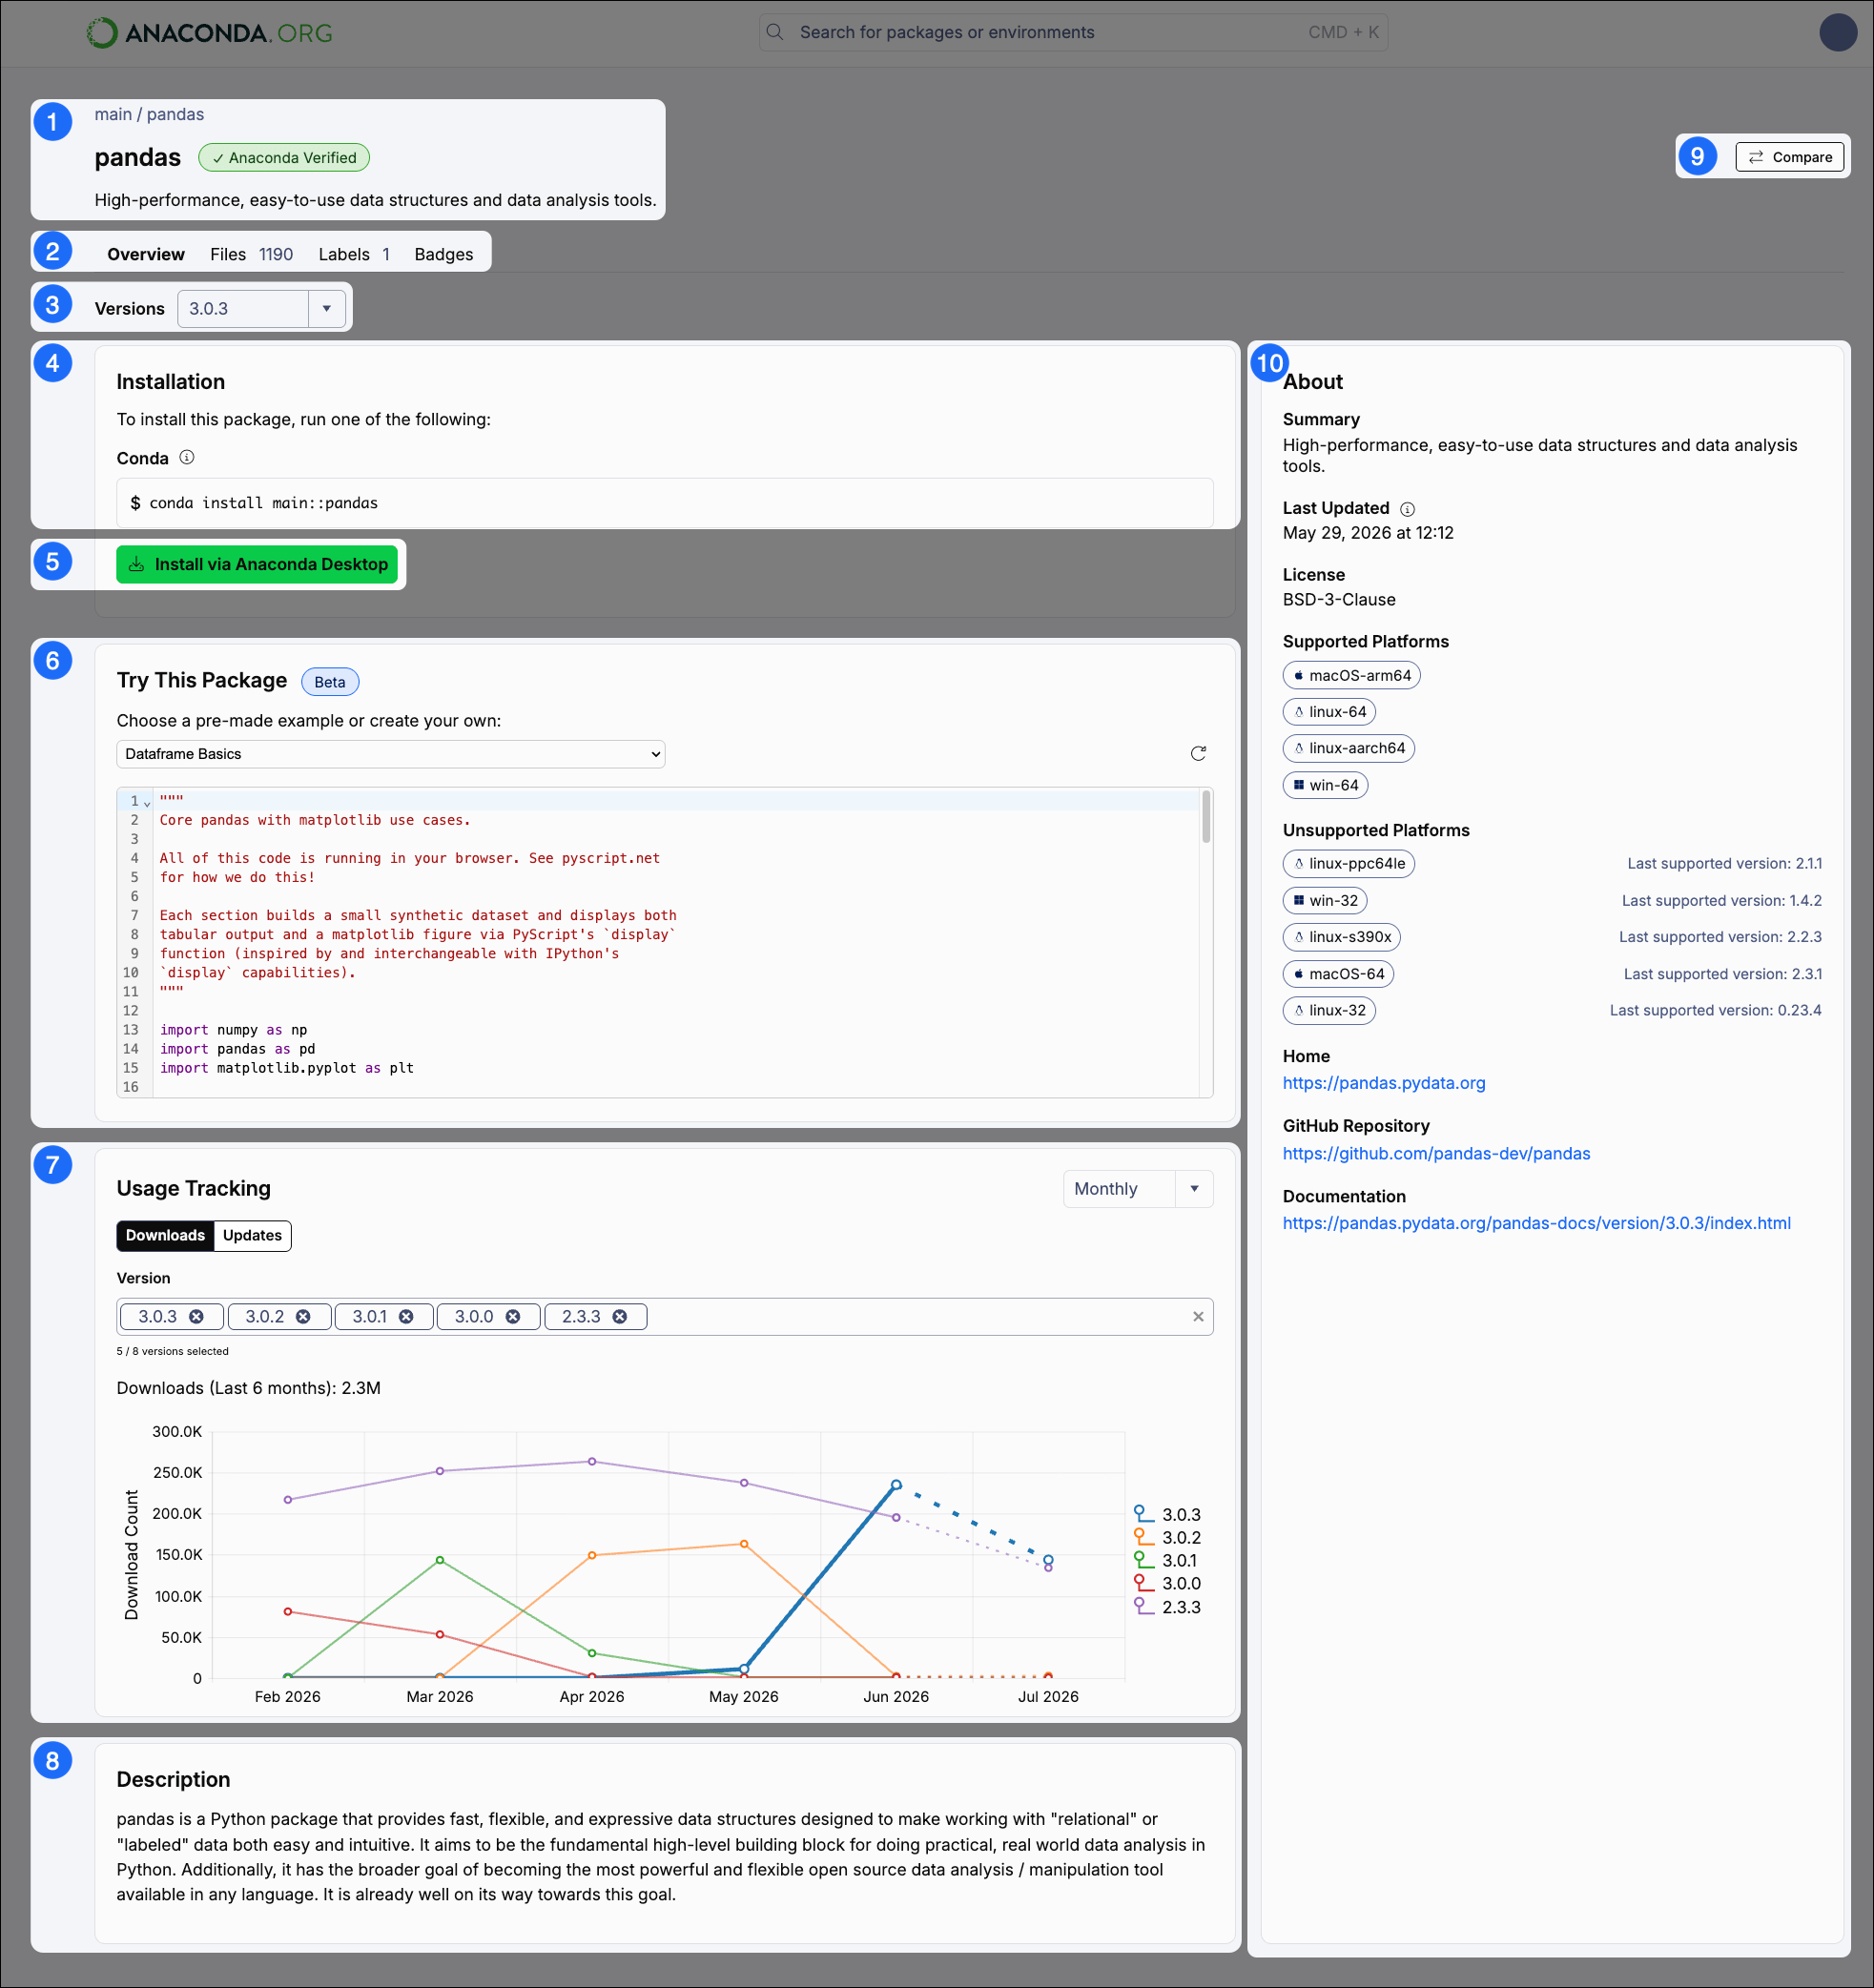 This section contains:
* Breadcrumbs linking back to the package's channel (channel / package). Select the channel to [view its homepage](/docs/anaconda-org/channels).
* The name of the package.
* A badge describing whether the package is Anaconda Curated or Community built.
* A short package description.
A set of tabs giving you access to more package information:
Overview
General information further outlined in the descriptions below. Selected by default.
Files
Lists of package [archive files](/docs/anaconda-org/maintainer-guide/package-files) (such as `.conda` and `.tar.bz2`) that you can download.
Labels
A list of package [labels](/docs/anaconda-org/maintainer-guide/labels) created by the package maintainer.
Badges
A list of badges relevant to the selected package and resources for embedding the badges in your web page.
Packages from the [conda-pypi](https://anaconda.org/channels/conda-pypi) channel display a simplified detail page with the **Overview** and **Files** tabs only. The **Labels** and **Badges** tabs are not available for conda-pypi packages.
Use the dropdown to select the package version you want to download. The information on the **Overview** tab changes when the version changes. The latest version is selected by default.
Installation commands for the package version selected. Select the command to copy it for use in your command line interface (CLI).
Click **Install via Anaconda Desktop** to install this package into your environment using Anaconda Desktop. For more information, see [Packages](/docs/anaconda-desktop/packages).
This feature is in beta and is only available for certain packages.
Run a pre-made code example using the package to see how it works. You can also use the "Your own example" option to create your own code using the package right in the browser. The Try This Package feature is powered by [PyScript](https://pyscript.net/).
Use the Downloads and Updates tables to view the usage statistics for your selected package.
Downloads table
Compares download numbers within the last six months. Use the **Version** dropdown above the table to add or remove package versions you want to compare.
Updates table
Displays number of updates released by the package's maintainers. Select *Monthly* to view updates within the last four months or *Weekly* to view updates within the last six weeks.
A description of the selected package.
An **Compare** button for comparing this package to others. For more information, see [Comparing packages](/docs/anaconda-org/comparing-packages).
General information about the selected package, including the date and time when the package was last updated, the package's license, supported (and unsupported) platforms and architectures, and relevant links for more information about the package.
This section contains:
* Breadcrumbs linking back to the package's channel (channel / package). Select the channel to [view its homepage](/docs/anaconda-org/channels).
* The name of the package.
* A badge describing whether the package is Anaconda Curated or Community built.
* A short package description.
A set of tabs giving you access to more package information:
Overview
General information further outlined in the descriptions below. Selected by default.
Files
Lists of package [archive files](/docs/anaconda-org/maintainer-guide/package-files) (such as `.conda` and `.tar.bz2`) that you can download.
Labels
A list of package [labels](/docs/anaconda-org/maintainer-guide/labels) created by the package maintainer.
Badges
A list of badges relevant to the selected package and resources for embedding the badges in your web page.
Packages from the [conda-pypi](https://anaconda.org/channels/conda-pypi) channel display a simplified detail page with the **Overview** and **Files** tabs only. The **Labels** and **Badges** tabs are not available for conda-pypi packages.
Use the dropdown to select the package version you want to download. The information on the **Overview** tab changes when the version changes. The latest version is selected by default.
Installation commands for the package version selected. Select the command to copy it for use in your command line interface (CLI).
Click **Install via Anaconda Desktop** to install this package into your environment using Anaconda Desktop. For more information, see [Packages](/docs/anaconda-desktop/packages).
This feature is in beta and is only available for certain packages.
Run a pre-made code example using the package to see how it works. You can also use the "Your own example" option to create your own code using the package right in the browser. The Try This Package feature is powered by [PyScript](https://pyscript.net/).
Use the Downloads and Updates tables to view the usage statistics for your selected package.
Downloads table
Compares download numbers within the last six months. Use the **Version** dropdown above the table to add or remove package versions you want to compare.
Updates table
Displays number of updates released by the package's maintainers. Select *Monthly* to view updates within the last four months or *Weekly* to view updates within the last six weeks.
A description of the selected package.
An **Compare** button for comparing this package to others. For more information, see [Comparing packages](/docs/anaconda-org/comparing-packages).
General information about the selected package, including the date and time when the package was last updated, the package's license, supported (and unsupported) platforms and architectures, and relevant links for more information about the package.
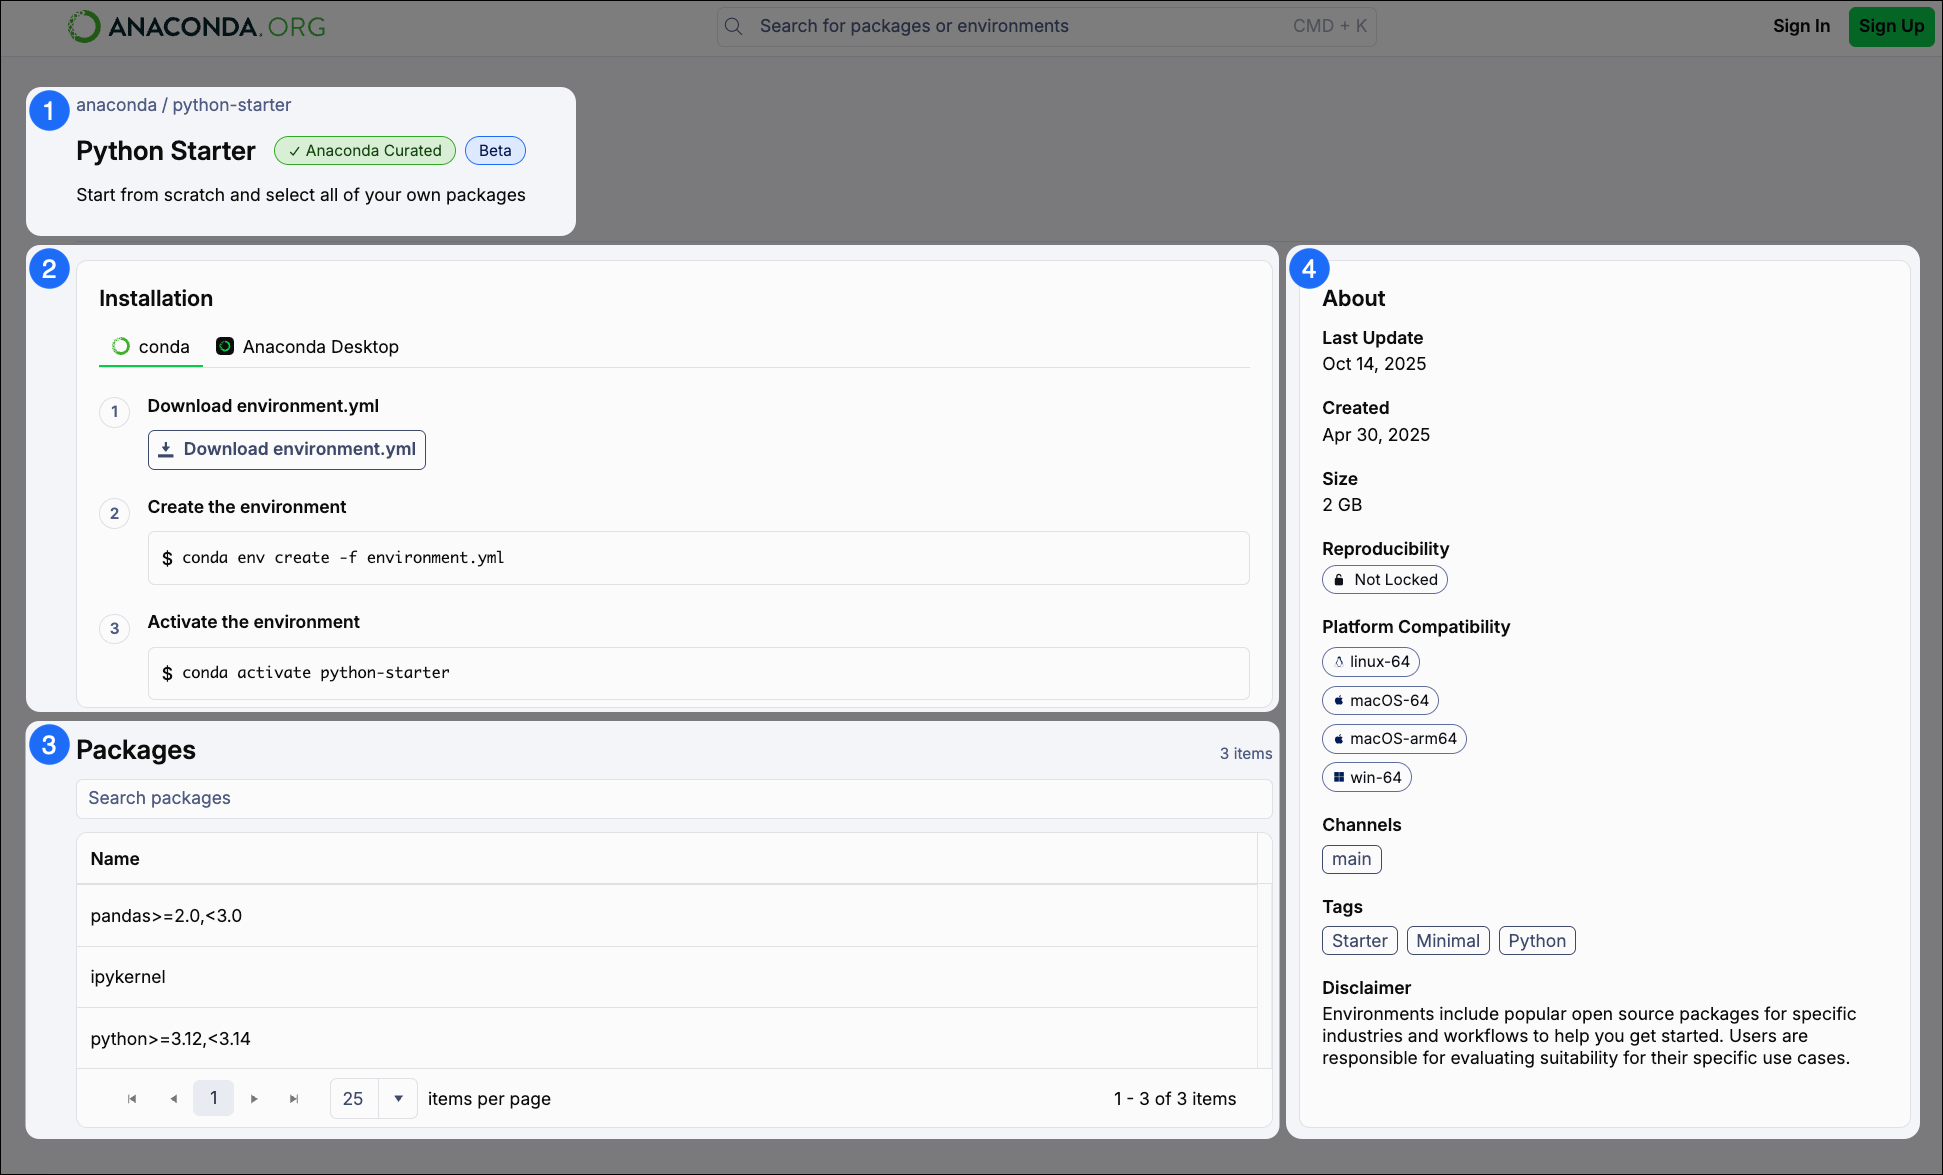 This section contains:
* Breadcrumbs linking back to the environment's organization (organization / environment). Select the organization to [view its channel homepage](/docs/anaconda-org/channels).
* The name of the environment.
* A badge describing that the environment is Anaconda Curated.
* A short environment description.
Commands to install the environment with conda. Click **Download environment.yml** to download the environment's `.yml` file to your computer.
The downloaded `environment.yml` file is saved to your Downloads folder. To use the install command as-is, either move the file to your current working directory or specify the full path to the file:
```sh theme={null}
conda env create -f %USERPROFILE%\Downloads\environment.yml
```
```sh theme={null}
conda env create -f ~/Downloads/environment.yml
```
The full list of packages included in the environment. Any pinned version specifications will also be listed with the corresponding package.
General information about the selected environment, including the date and time when the environment was last updated, whether or not the environment contains a lockfile, supported (and unsupported) platforms and architectures, channels the environment uses, and tags associated with the environment.
This section contains:
* Breadcrumbs linking back to the environment's organization (organization / environment). Select the organization to [view its channel homepage](/docs/anaconda-org/channels).
* The name of the environment.
* A badge describing that the environment is Anaconda Curated.
* A short environment description.
Commands to install the environment with conda. Click **Download environment.yml** to download the environment's `.yml` file to your computer.
The downloaded `environment.yml` file is saved to your Downloads folder. To use the install command as-is, either move the file to your current working directory or specify the full path to the file:
```sh theme={null}
conda env create -f %USERPROFILE%\Downloads\environment.yml
```
```sh theme={null}
conda env create -f ~/Downloads/environment.yml
```
The full list of packages included in the environment. Any pinned version specifications will also be listed with the corresponding package.
General information about the selected environment, including the date and time when the environment was last updated, whether or not the environment contains a lockfile, supported (and unsupported) platforms and architectures, channels the environment uses, and tags associated with the environment.
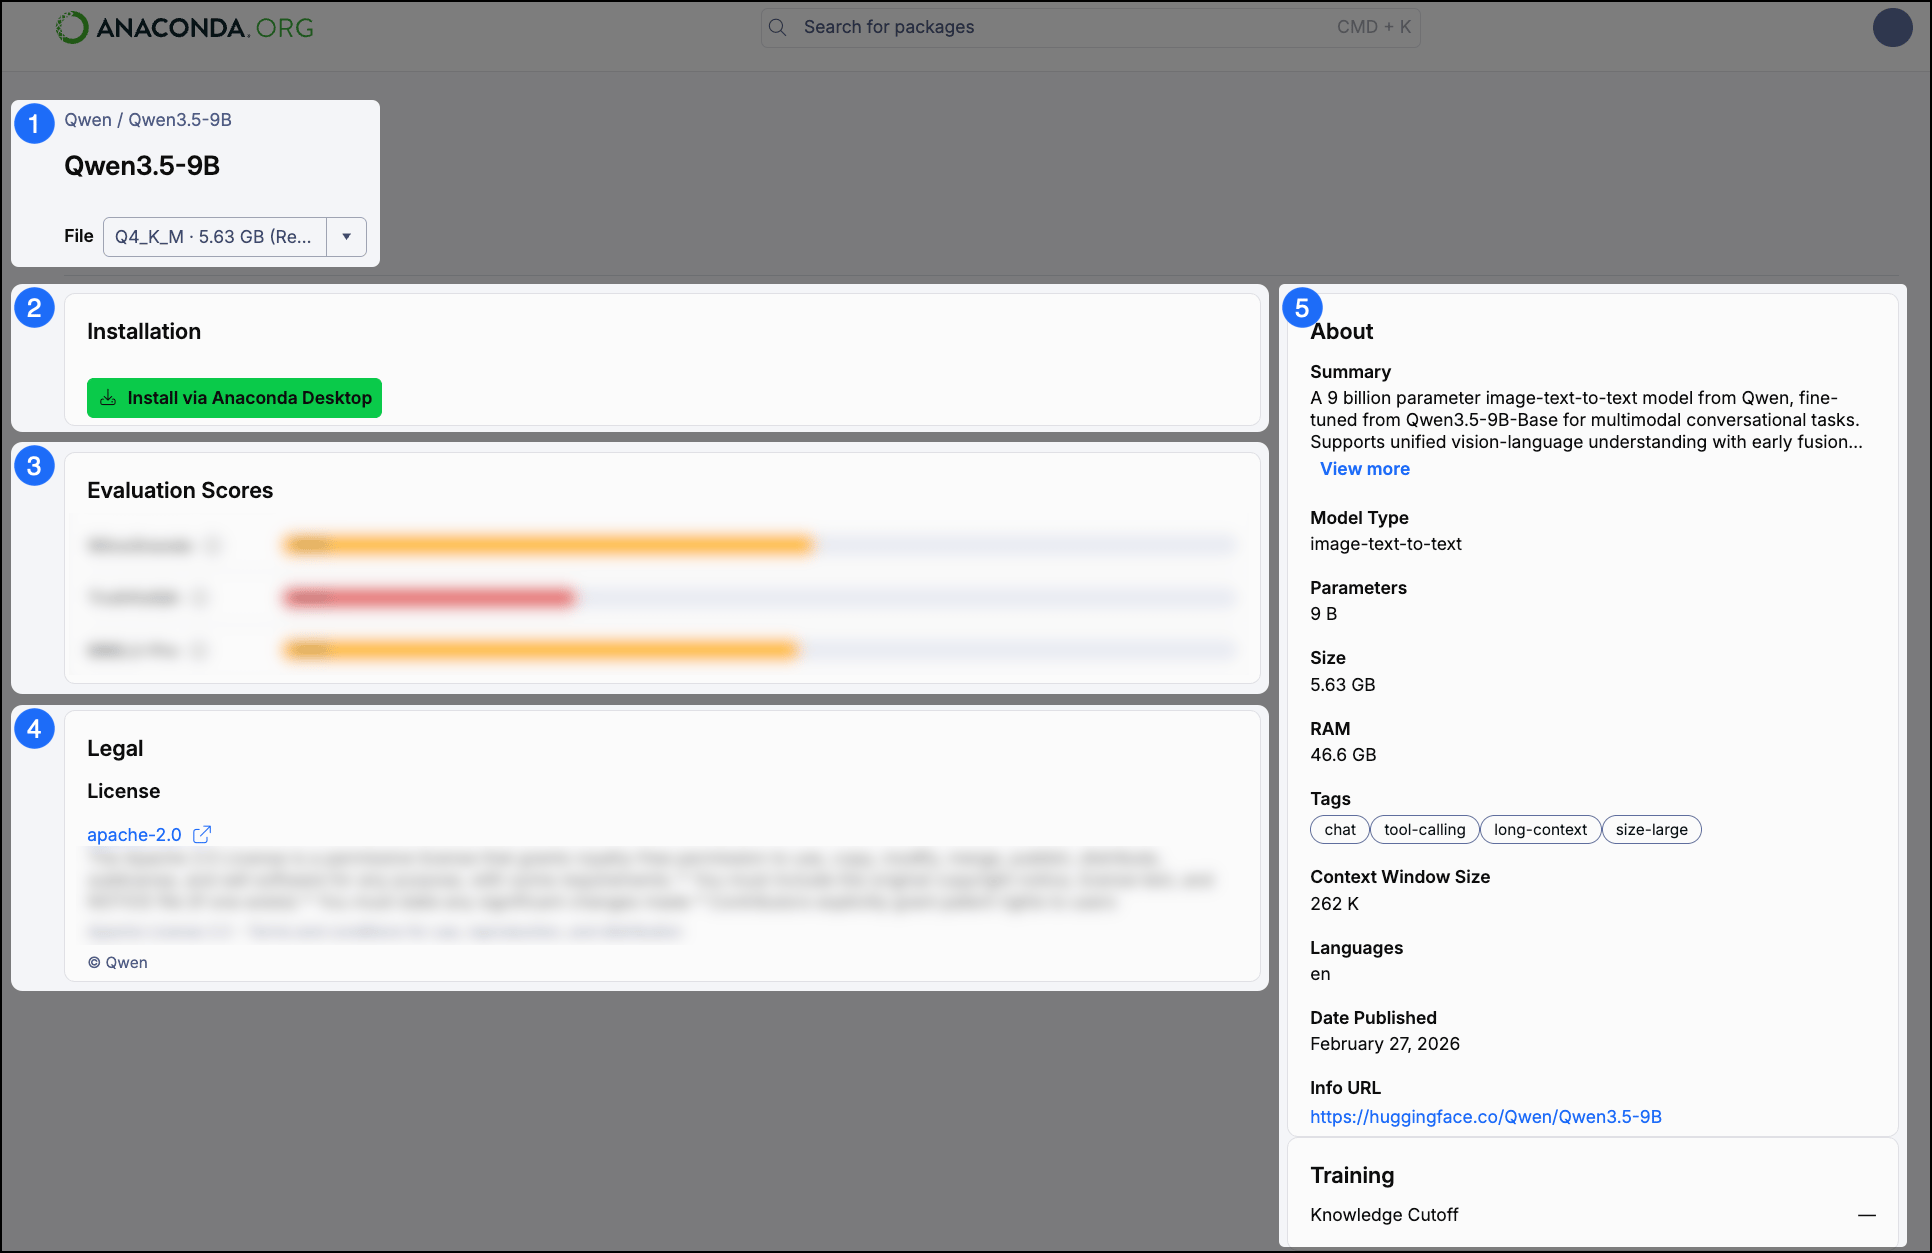 This section contains:
* The model name.
* The publisher.
* Sign-in required A dropdown menu to select the model variant or quantization you want to view.
You can select which quantization to use for a model. Each quantization is a separate, pre-built version of a model stored as a GGUF (`.gguf`) file. Quantization reduces the precision of a model's weights, converting them from high-precision floating point values to lower bit depths like 8-bit or 4-bit integers. This shrinks file size and RAM requirements at the cost of some output quality.
**Reading quantization names**
Anaconda models use a naming convention that encodes the bit depth and quantization method. For example, `q4_k_m` means a 4-bit quantization using the medium-variant K-quant method.
Part
Meaning
Example
`q` + number
Bits per weight. Lower numbers mean smaller files and lower RAM usage, but reduced accuracy.
`q4` = 4 bits,
This section contains:
* The model name.
* The publisher.
* Sign-in required A dropdown menu to select the model variant or quantization you want to view.
You can select which quantization to use for a model. Each quantization is a separate, pre-built version of a model stored as a GGUF (`.gguf`) file. Quantization reduces the precision of a model's weights, converting them from high-precision floating point values to lower bit depths like 8-bit or 4-bit integers. This shrinks file size and RAM requirements at the cost of some output quality.
**Reading quantization names**
Anaconda models use a naming convention that encodes the bit depth and quantization method. For example, `q4_k_m` means a 4-bit quantization using the medium-variant K-quant method.
Part
Meaning
Example
`q` + number
Bits per weight. Lower numbers mean smaller files and lower RAM usage, but reduced accuracy.
`q4` = 4 bits,
`q8` = 8 bits
`_k`
K-quant method. Allocates bits more intelligently across model layers to improve quality at a given size compared to the legacy method.
`q4_k`
`_s`, `_m`, `_l`
Size variant within a K-quant level: small, medium, or large. Larger variants use slightly more memory but produce better output quality.
`q4_k_m`
`_0`
Legacy quantization scheme. Generally less efficient than K-quant variants at the same bit depth.
`q8_0`
`f16`
16-bit floating point with no quantization applied. Highest accuracy, but largest file size and RAM requirements.
`f16`
**Choosing a quantization**
Select a quantization based on your hardware and accuracy needs:
* **Lower bit depth (`q2`-`q4`)**: Smaller files, lower RAM usage, and faster inference, but noticeably reduced output quality. Best suited for resource-constrained hardware.
* **Mid-range (`q5`-`q6`)**: A practical balance between size and quality that works well on most hardware.
* **Higher bit depth (`q8`, `f16`)**: Near full-precision output quality, but requires significantly more RAM and disk space.
Lower quantization levels are well-suited for development and testing due to their lower memory requirements. Higher quantization levels preserve more model fidelity and are better suited for production use.
Click **Install via Anaconda Desktop** to open the model in [Anaconda Desktop](/docs/anaconda-desktop/model-catalog) for local download and use. If you do not have Desktop installed, you are prompted to download and install it.
Sign-in required
The evaluation scores for the model, including various benchmarks and performance metrics.
Sign-in required
The license specifications for the model.
General information about the model, including a description, model type, size, RAM, tags, the date it was published, and various informational links.
A model's type reflects its training objective and architecture. Anaconda.org currently includes the following model types:
`Text Generation`
These models produce coherent, contextually relevant natural language based on user input. Common use cases include content creation, coding assistance, and conversational AI.
`Sentence Similarity`
These models encode text into a vector database (embedding) that captures semantic meaning, enabling efficient comparison and analysis of text based on contextual relationships. Common use cases include semantic search and recommendation systems.
`Image Text to Text`
These models accept both text and image inputs and produce text output. They can be used for tasks such as image captioning, visual question answering, and document understanding. When running as an API server, these models can process image inputs sent directly to the server.
Tags reflect what a model can do beyond its primary purpose. For example, a `Text Generation` model might also support code generation. Notable tags include:
* `Embedding`: The model can generate vector representations of text for use in semantic search, RAG pipelines, and similarity comparisons.
* `Tool Calling`: The model can invoke external tools or APIs to retrieve information or perform actions during inference.
* `Code Generation`: The model can produce, complete, or transform source code across one or more programming languages.
* `Guardrail`: The model is designed to evaluate or filter content, typically used to enforce safety or policy constraints in AI pipelines.
* `Base Model`: The model has not been fine-tuned for a specific task and is intended as a foundation for further training or customization.
* `Instruction Following`: The model has been trained to respond reliably to structured instructions or prompts.