> ## Documentation Index
> Fetch the complete documentation index at: https://anaconda.com/docs/llms.txt
> Use this file to discover all available pages before exploring further.
# PyCharm
export const Comments = ({children}) => {
return ;
};
These instructions refer to Anaconda Distribution exclusively, but also work with Miniconda.
[PyCharm](https://www.jetbrains.com/pycharm/) is an IDE that integrates with Jupyter Notebook, has an interactive Python console, and supports [Anaconda](https://www.anaconda.com/download) and multiple scientific packages. PyCharm also supports creating virtual environments for Python with conda.
More of a visual learner? [Sign in to Anaconda.com](https://auth.anaconda.com/ui/login?return_to=https://anaconda.com/app/) and enroll in our Get Started with Anaconda course to learn to [create a simple Python program with PyCharm](https://learning.anaconda.com/courses/take/get-started-with-anaconda/lessons/63068075-create-a-simple-python-program-in-pycharm).
## Configuring a conda environment in PyCharm
Python projects often require specific setups, with access to different versions of Python and different packages and their dependencies. Conda environments isolate your PyCharm projects so that each one is built and run with the exact Python specifications it requires.
You can use the `base` conda environment with a new project, create a new conda environment during project setup, or configure an existing conda environment for a new project. You can also switch conda environments within an existing project.
PyCharm offers two conda-related interpreter types:
* **Base conda**: Uses the `base` conda environment directly. This is the quickest option if you don't need a separate environment.
* **Custom environment**: Lets you create a new conda environment or select an existing one for your project.
### Using the base conda environment
To create a new project using your `base` conda environment:
Anaconda recommends creating a separate conda environment for each project. Using the base environment for multiple projects can cause dependency conflicts.
1. Open PyCharm and click **New Project**.
2. In the New Project dialog, set the project location in the **Location** field.
3. Under **Interpreter type**, select **Base conda**.
4. PyCharm detects your conda installation and displays the path in the **Path to conda** field. If PyCharm does not detect conda automatically, specify the path to the conda executable (typically `\Scripts\conda.exe` on Windows or `/condabin/conda` on macOS/Linux).
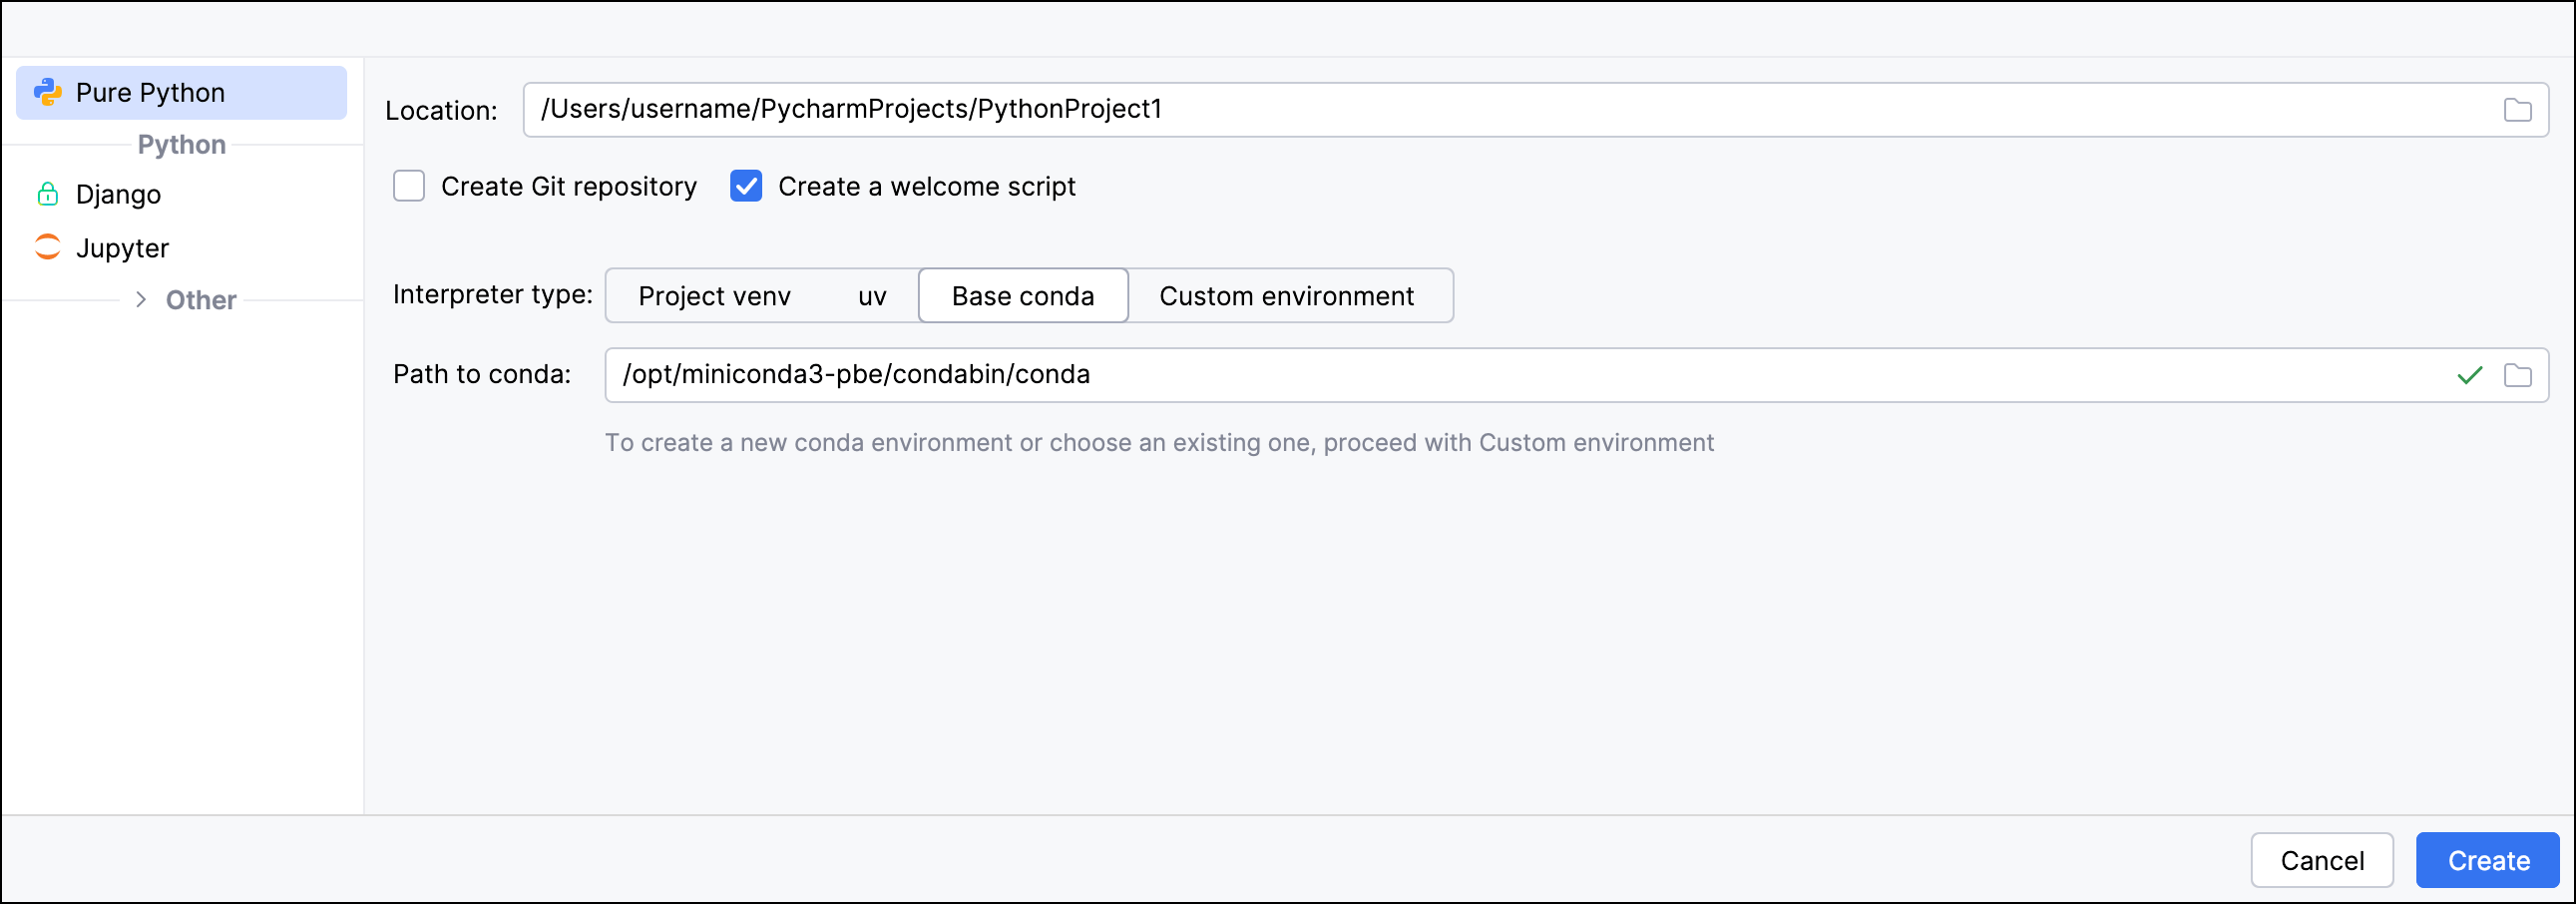 5. Click **Create**.
### Using custom conda environments
You can create a new conda environment as part of the project setup, or use an existing conda environment:
1. Open PyCharm and click **New Project**.
2. In the New Project dialog, set the project location in the **Location** field.
3. Under **Interpreter type**, select **Custom environment**.
To create a new conda environment:
1. Under **Environment**, select **Generate new**.
2. From the **Type** dropdown, select *Conda*.
3. From the **Python version** dropdown, select the Python version you want.
4. Enter your environment name in the **Name** field.
5. PyCharm detects your conda installation and displays the path in the **Path to conda** field. If PyCharm does not detect conda automatically, specify the path to the conda executable (typically `\Scripts\conda.exe` on Windows or `/condabin/conda` on macOS/Linux).
5. Click **Create**.
### Using custom conda environments
You can create a new conda environment as part of the project setup, or use an existing conda environment:
1. Open PyCharm and click **New Project**.
2. In the New Project dialog, set the project location in the **Location** field.
3. Under **Interpreter type**, select **Custom environment**.
To create a new conda environment:
1. Under **Environment**, select **Generate new**.
2. From the **Type** dropdown, select *Conda*.
3. From the **Python version** dropdown, select the Python version you want.
4. Enter your environment name in the **Name** field.
5. PyCharm detects your conda installation and displays the path in the **Path to conda** field. If PyCharm does not detect conda automatically, specify the path to the conda executable (typically `\Scripts\conda.exe` on Windows or `/condabin/conda` on macOS/Linux).
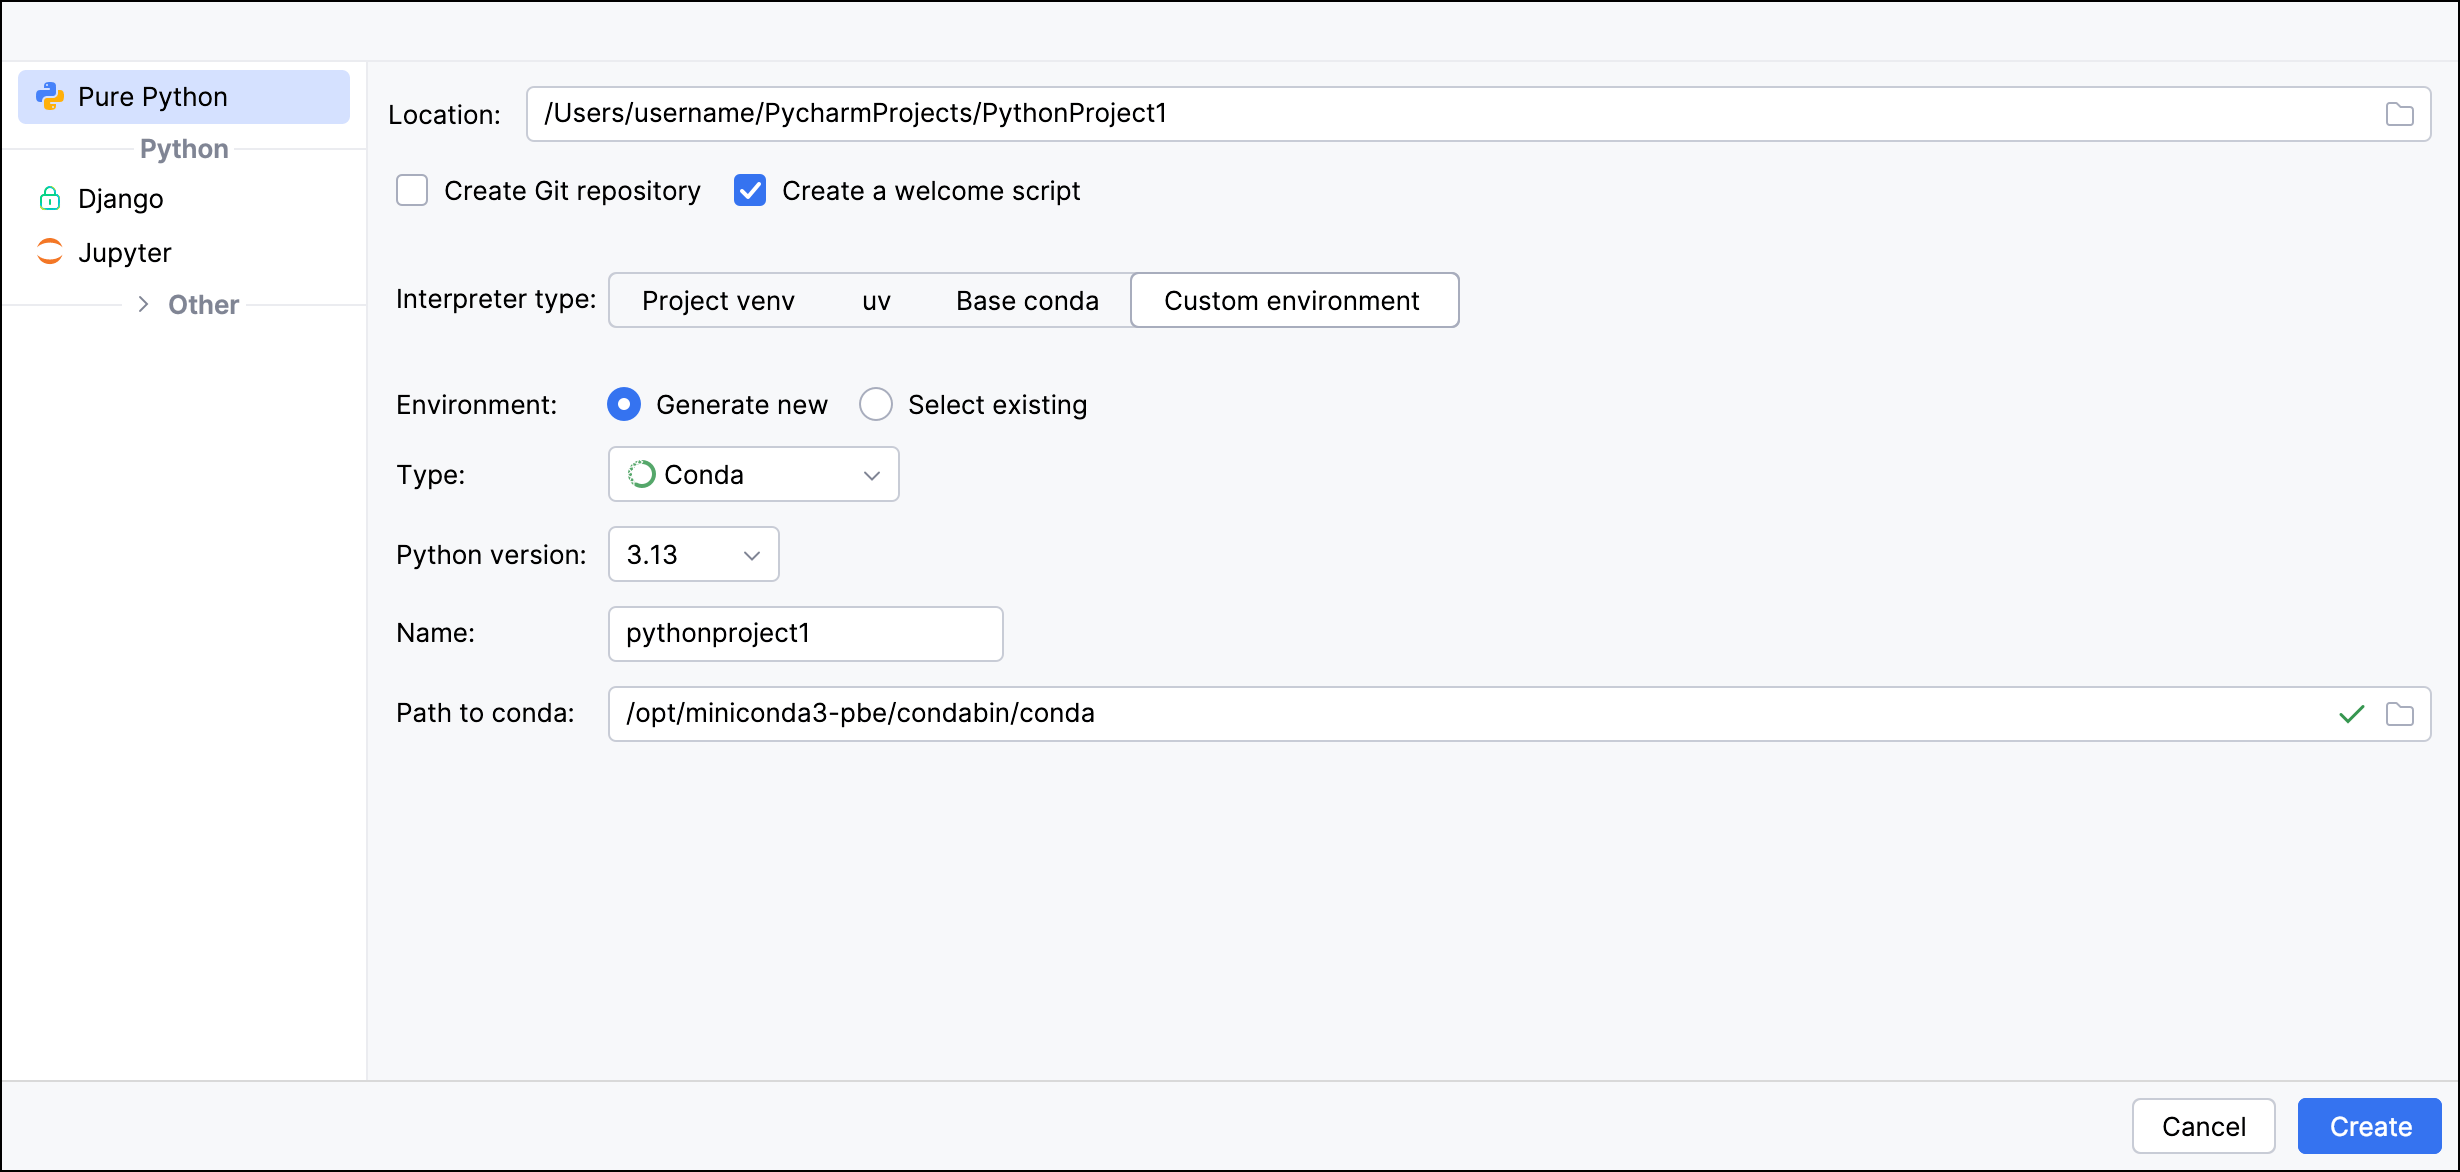 6. Click **Create** to create your project and conda environment.
7. Verify that the conda environment was created by running `conda info --envs` in Anaconda Prompt (Terminal on macOS/Linux):
```sh theme={null}
conda info --envs
# conda environments:
base * /opt/miniconda3/
pythonproject1 /opt/miniconda3/envs/pythonproject1
```
You can also view your environments in the **Environments** tab in Anaconda Navigator.
To use an existing conda environment:
1. Under **Environment**, select **Select existing**.
2. From the **Type** dropdown, select *Conda*.
3. PyCharm detects your conda installation and displays the path in the **Path to conda** field. If PyCharm does not detect conda automatically, specify the path to the conda executable (typically `\Scripts\conda.exe` on Windows or `/condabin/conda` on macOS/Linux).
4. Select the environment from the **Environment** dropdown.
If you specified the path to conda manually but don't see your environments listed, you might need to click **Reload environments**.
6. Click **Create** to create your project and conda environment.
7. Verify that the conda environment was created by running `conda info --envs` in Anaconda Prompt (Terminal on macOS/Linux):
```sh theme={null}
conda info --envs
# conda environments:
base * /opt/miniconda3/
pythonproject1 /opt/miniconda3/envs/pythonproject1
```
You can also view your environments in the **Environments** tab in Anaconda Navigator.
To use an existing conda environment:
1. Under **Environment**, select **Select existing**.
2. From the **Type** dropdown, select *Conda*.
3. PyCharm detects your conda installation and displays the path in the **Path to conda** field. If PyCharm does not detect conda automatically, specify the path to the conda executable (typically `\Scripts\conda.exe` on Windows or `/condabin/conda` on macOS/Linux).
4. Select the environment from the **Environment** dropdown.
If you specified the path to conda manually but don't see your environments listed, you might need to click **Reload environments**.
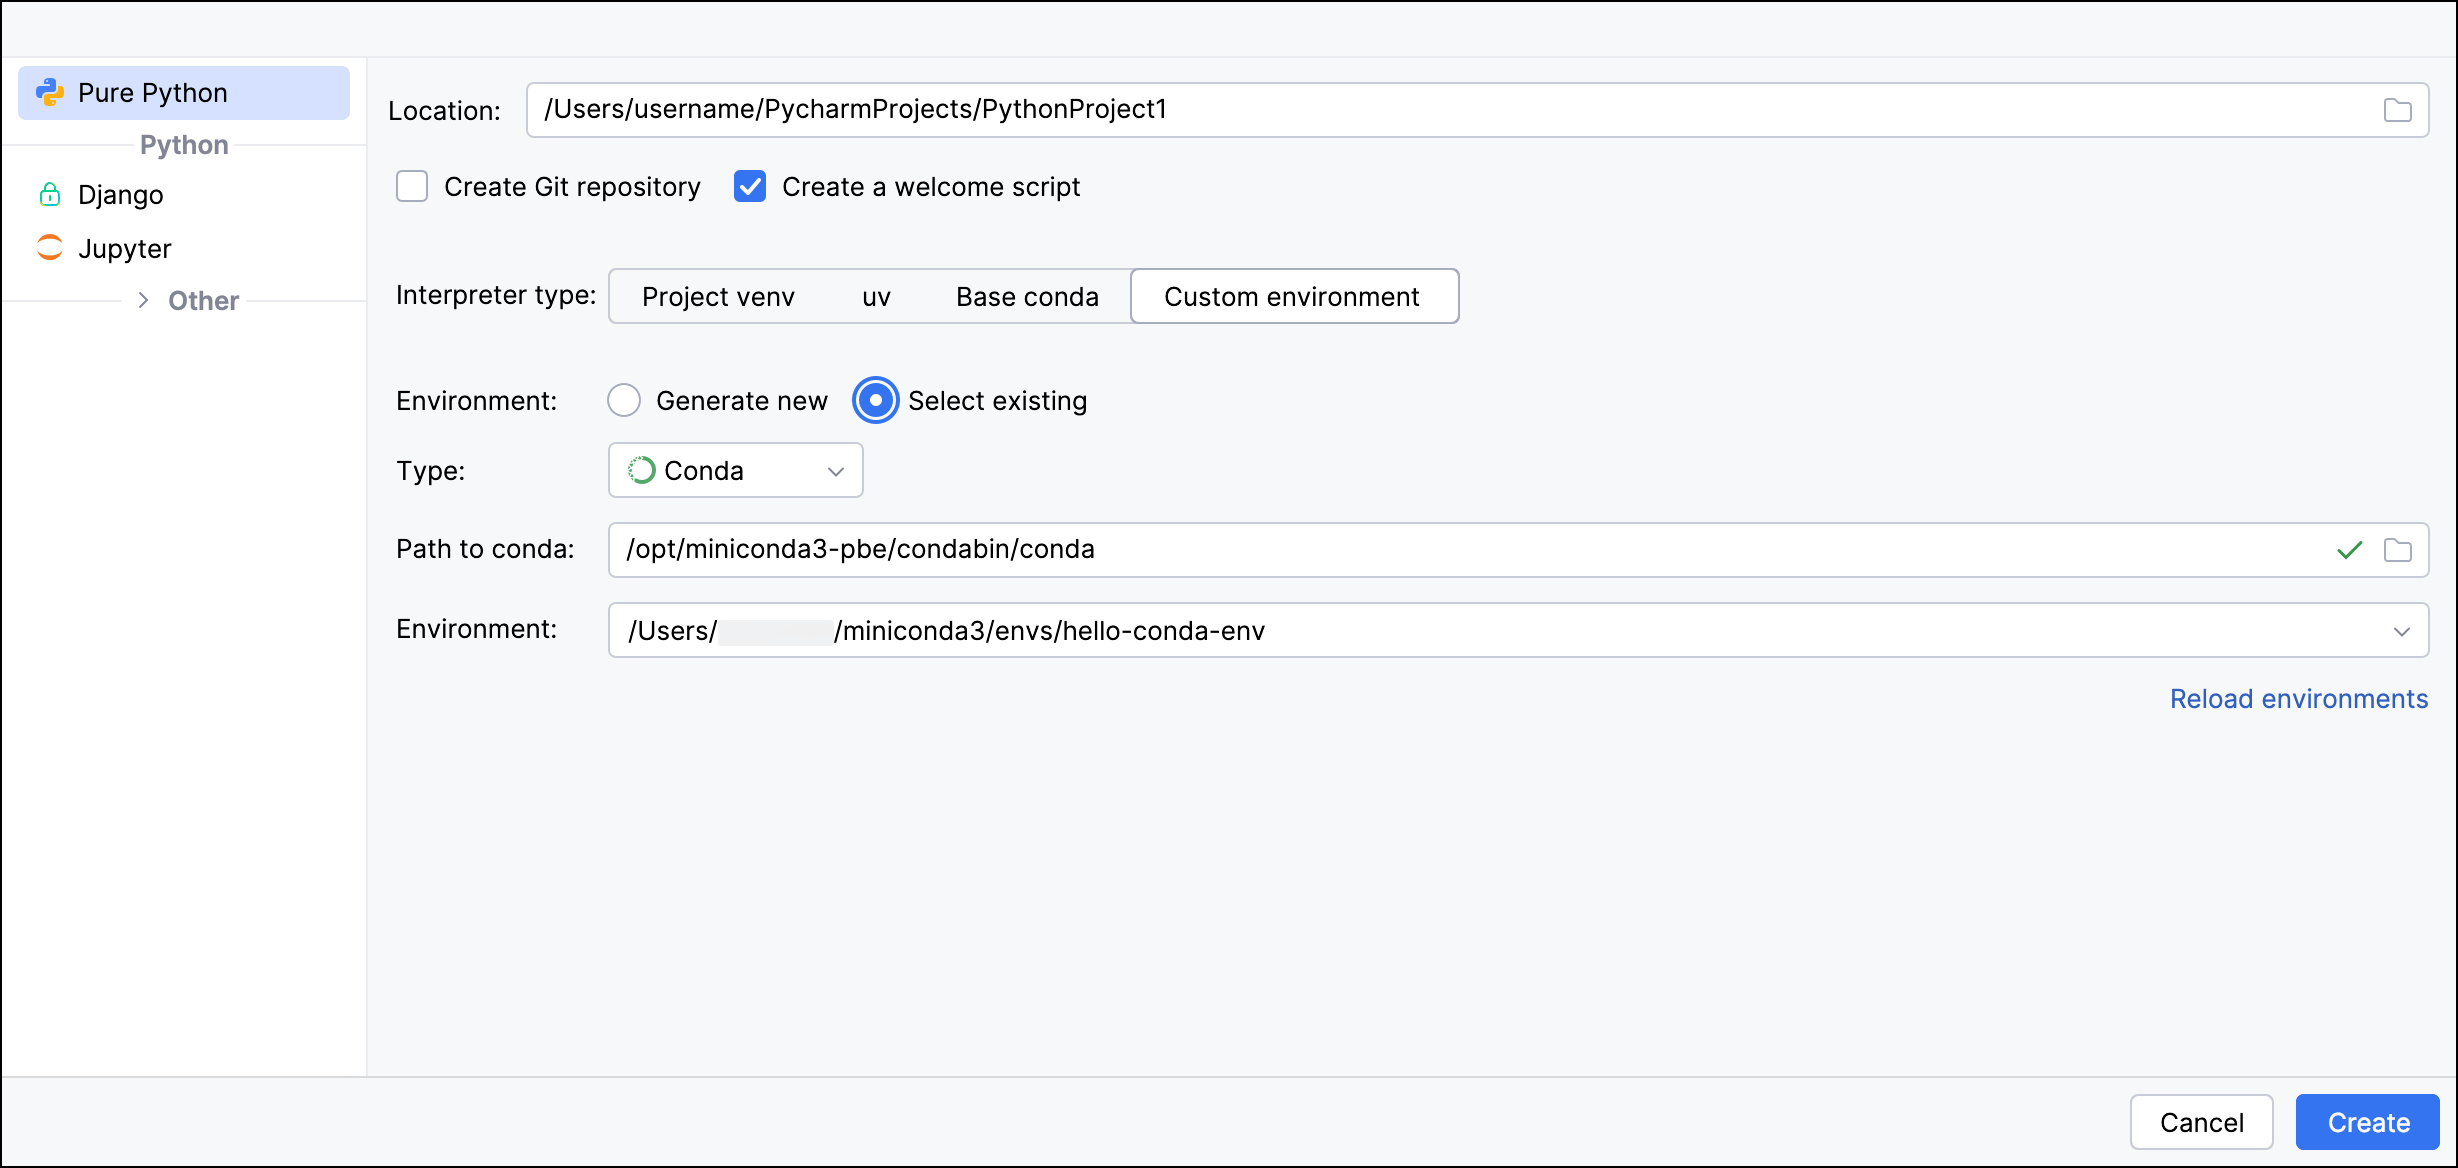 5. Click **Create** to create your project.
### Switching environments within a PyCharm project
To change the conda environment associated with an ongoing project:
1. Open the PyCharm project associated with the conda environment you want to change.
2. Click the settings icon in the top-right corner of the screen, then select *Settings...*.
3. In the left sidebar, select **Python** > **Interpreter**.
4. Click the **Add Interpreter** dropdown, then select *Add Local Interpreter...*.
To create a new environment:
1. Under **Environment**, select **Generate new**.
2. From the **Type** dropdown, select *Conda*.
3. From the **Python version** dropdown, select the Python version you want.
4. Enter an environment name in the **Name** field.
5. PyCharm detects your conda installation and displays the path in the **Path to conda** field. If PyCharm does not detect conda automatically, specify the path to the conda executable (typically `\Scripts\conda.exe` on Windows or `/condabin/conda` on macOS/Linux).
5. Click **Create** to create your project.
### Switching environments within a PyCharm project
To change the conda environment associated with an ongoing project:
1. Open the PyCharm project associated with the conda environment you want to change.
2. Click the settings icon in the top-right corner of the screen, then select *Settings...*.
3. In the left sidebar, select **Python** > **Interpreter**.
4. Click the **Add Interpreter** dropdown, then select *Add Local Interpreter...*.
To create a new environment:
1. Under **Environment**, select **Generate new**.
2. From the **Type** dropdown, select *Conda*.
3. From the **Python version** dropdown, select the Python version you want.
4. Enter an environment name in the **Name** field.
5. PyCharm detects your conda installation and displays the path in the **Path to conda** field. If PyCharm does not detect conda automatically, specify the path to the conda executable (typically `\Scripts\conda.exe` on Windows or `/condabin/conda` on macOS/Linux).
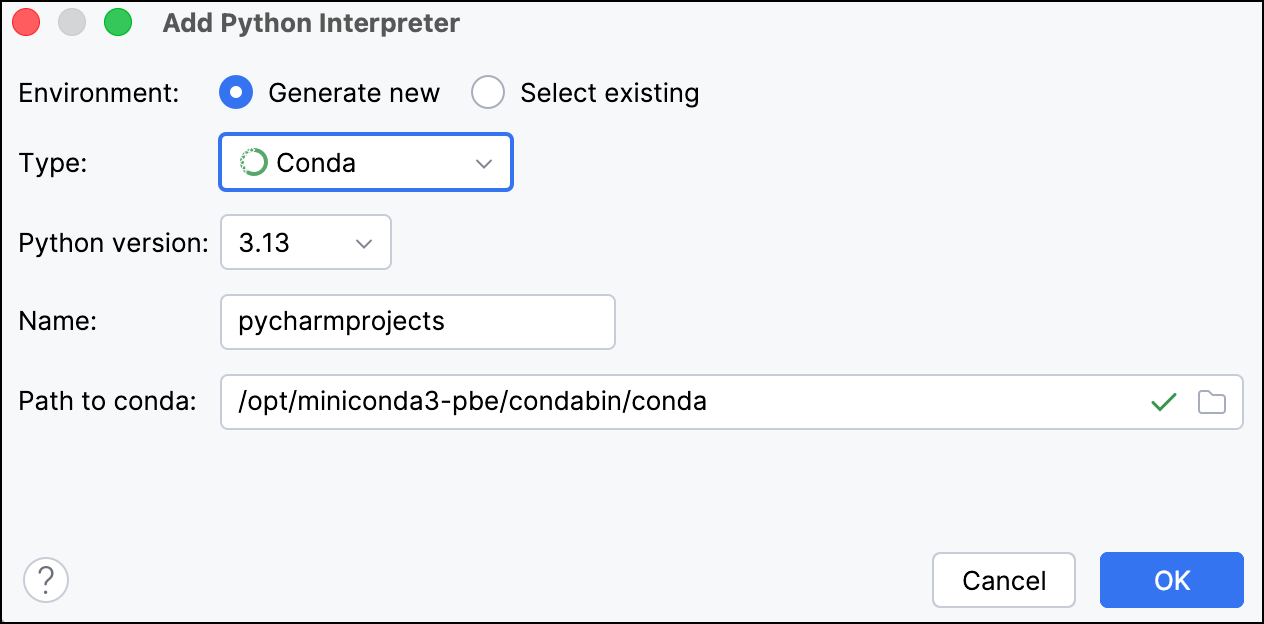 To use an existing environment:
1. Under **Environment**, select **Select existing**.
2. From the **Type** dropdown, select *Conda*.
3. PyCharm detects your conda installation and displays the path in the **Path to conda** field. If PyCharm does not detect conda automatically, specify the path to the conda executable (typically `\Scripts\conda.exe` on Windows or `/condabin/conda` on macOS/Linux).
4. Select an environment from the **Environment** dropdown.
If you specified the path to conda manually but don't see your environments listed, you might need to click **Reload environments**.
To use an existing environment:
1. Under **Environment**, select **Select existing**.
2. From the **Type** dropdown, select *Conda*.
3. PyCharm detects your conda installation and displays the path in the **Path to conda** field. If PyCharm does not detect conda automatically, specify the path to the conda executable (typically `\Scripts\conda.exe` on Windows or `/condabin/conda` on macOS/Linux).
4. Select an environment from the **Environment** dropdown.
If you specified the path to conda manually but don't see your environments listed, you might need to click **Reload environments**.
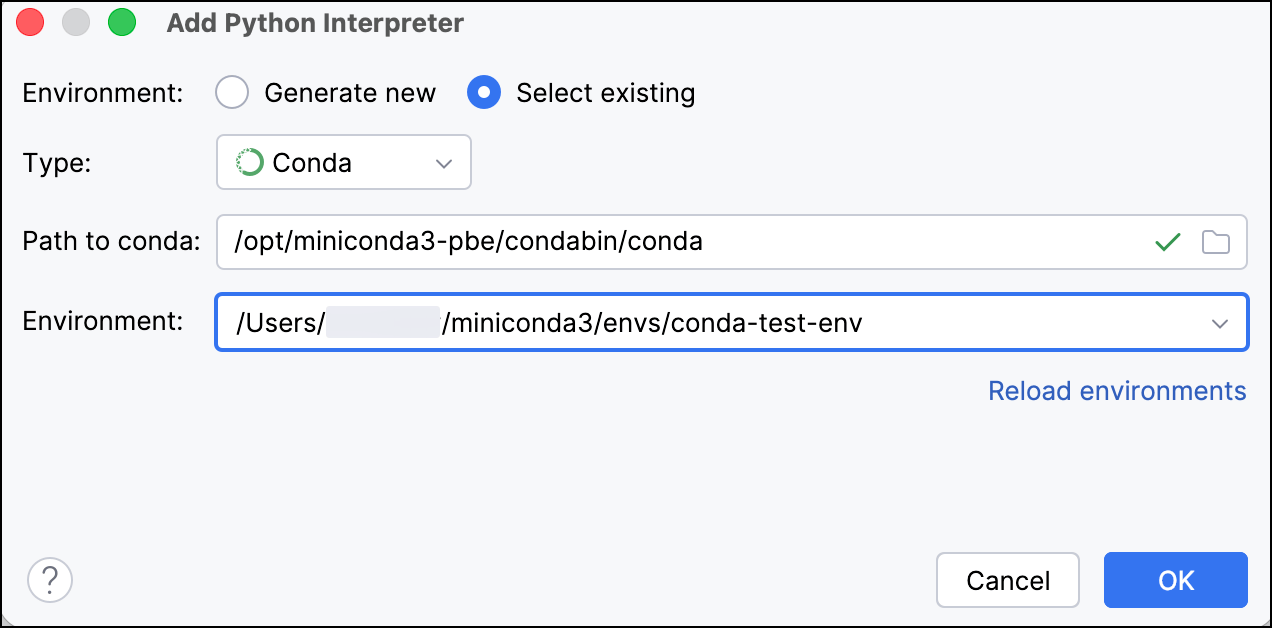 5. Click **OK** to finish changing your project's environment.
## Adding a package to a project
If your project uses a package that is not in the standard Python library, you can add it to your project's conda environment with PyCharm.
The project in this example uses the `flask` package. PyCharm flags the unresolved import with a red underline.
1. Hover over the import to see the "Unresolved reference `flask`" popup.
5. Click **OK** to finish changing your project's environment.
## Adding a package to a project
If your project uses a package that is not in the standard Python library, you can add it to your project's conda environment with PyCharm.
The project in this example uses the `flask` package. PyCharm flags the unresolved import with a red underline.
1. Hover over the import to see the "Unresolved reference `flask`" popup.
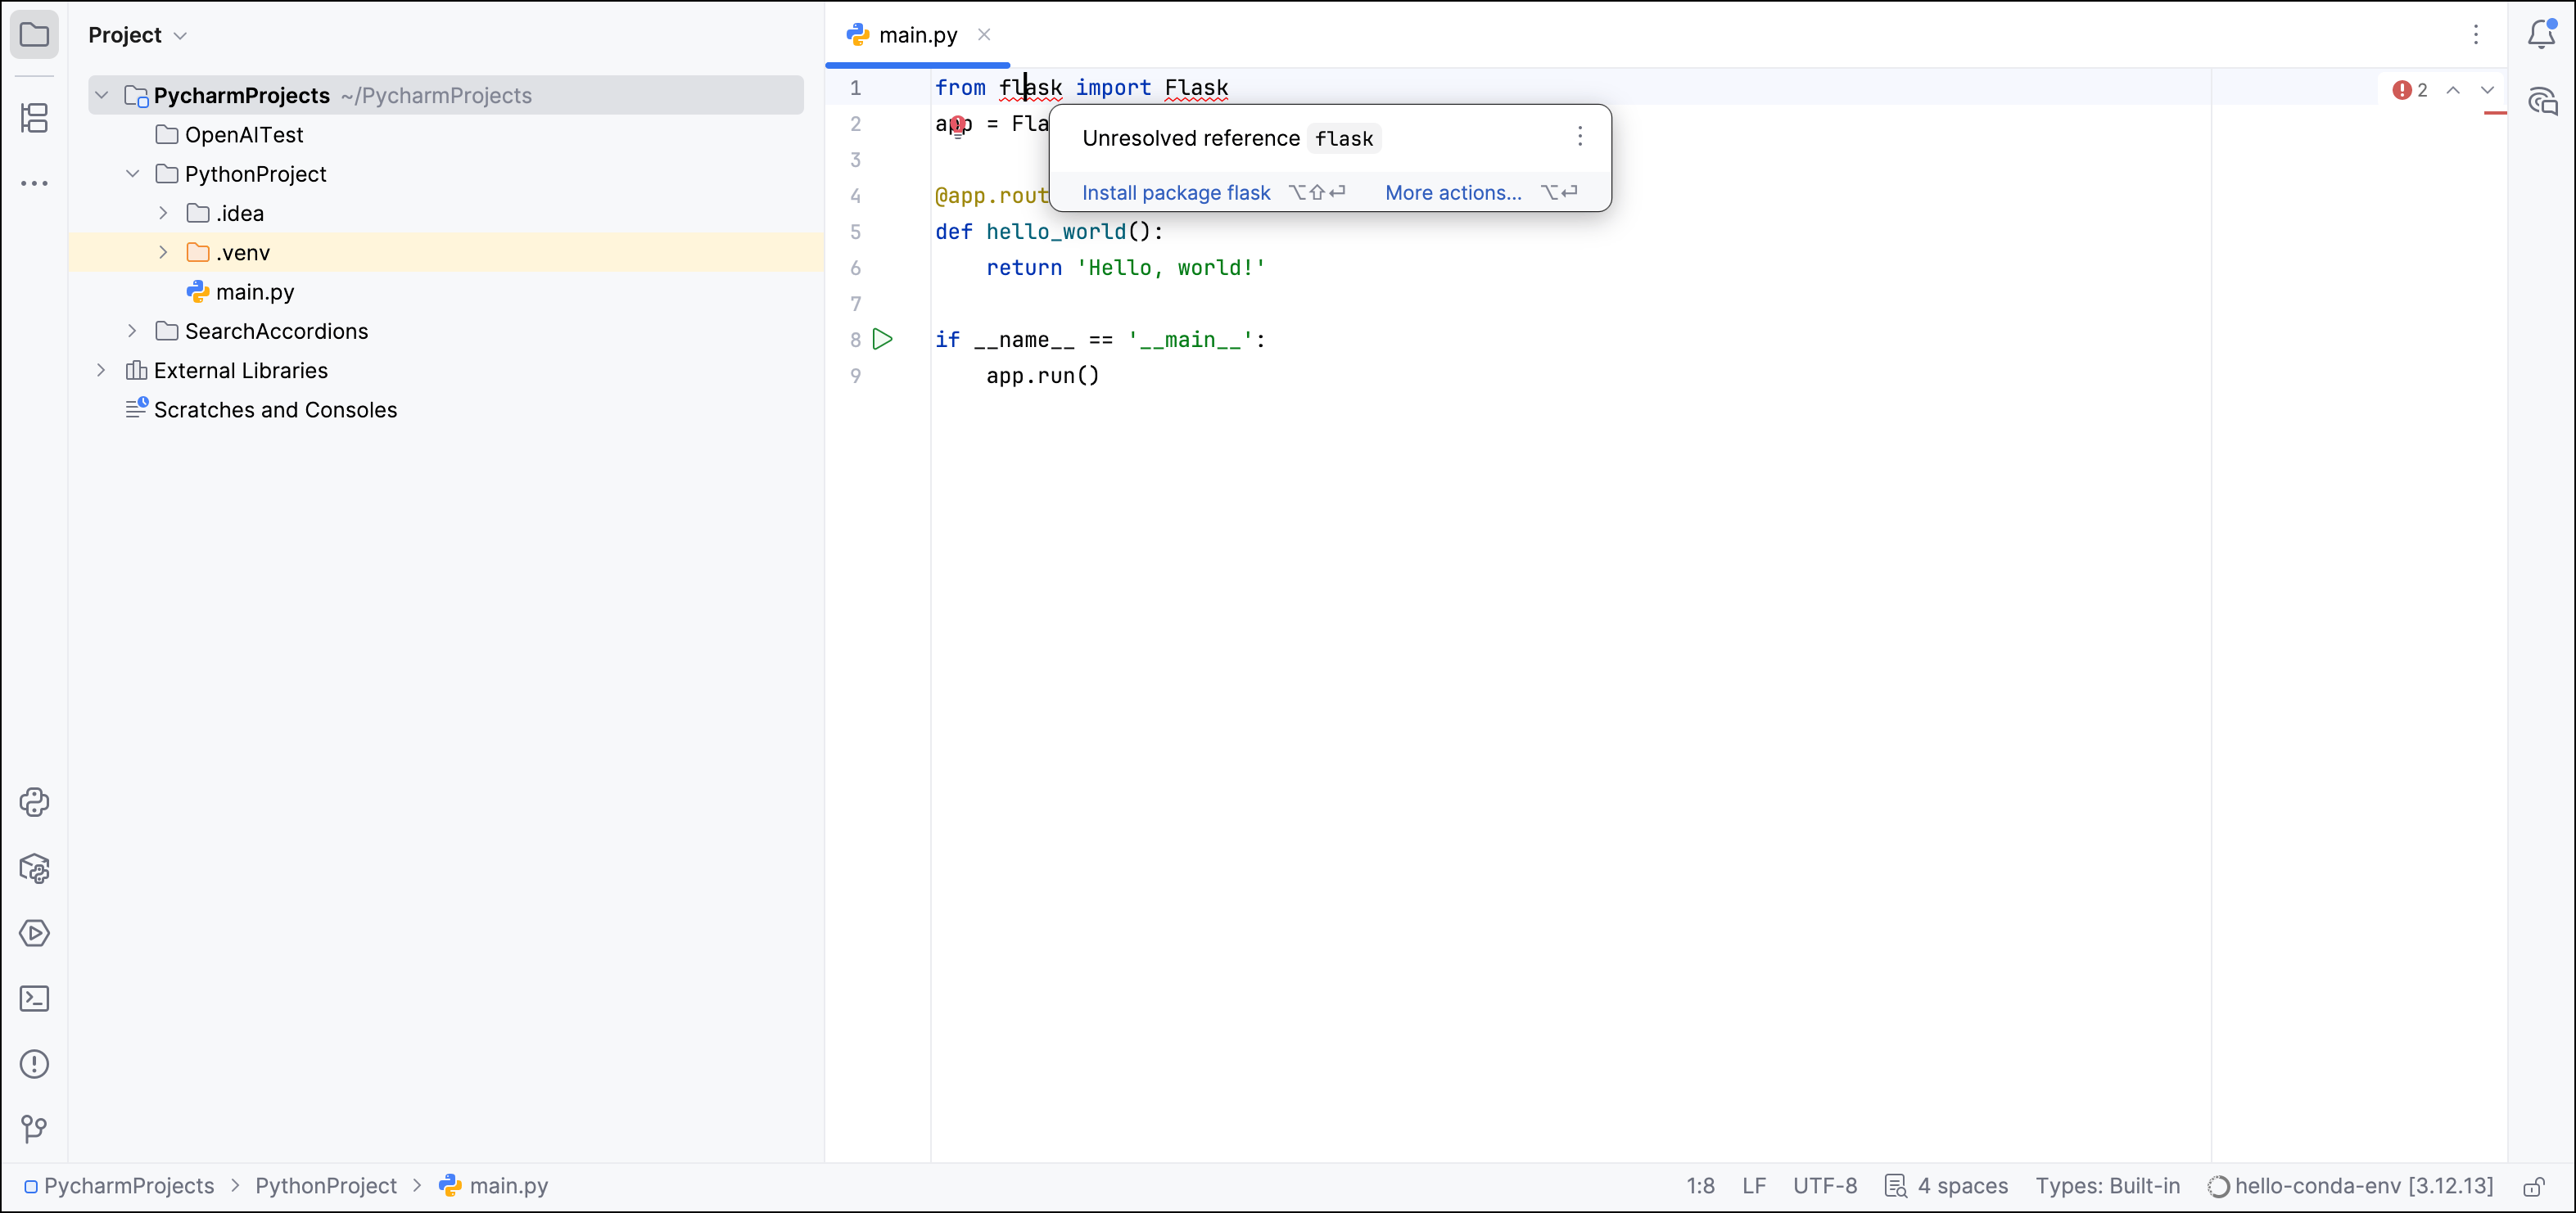 2. Click **Install package flask** in the popup to install `flask` to the environment connected to your project.
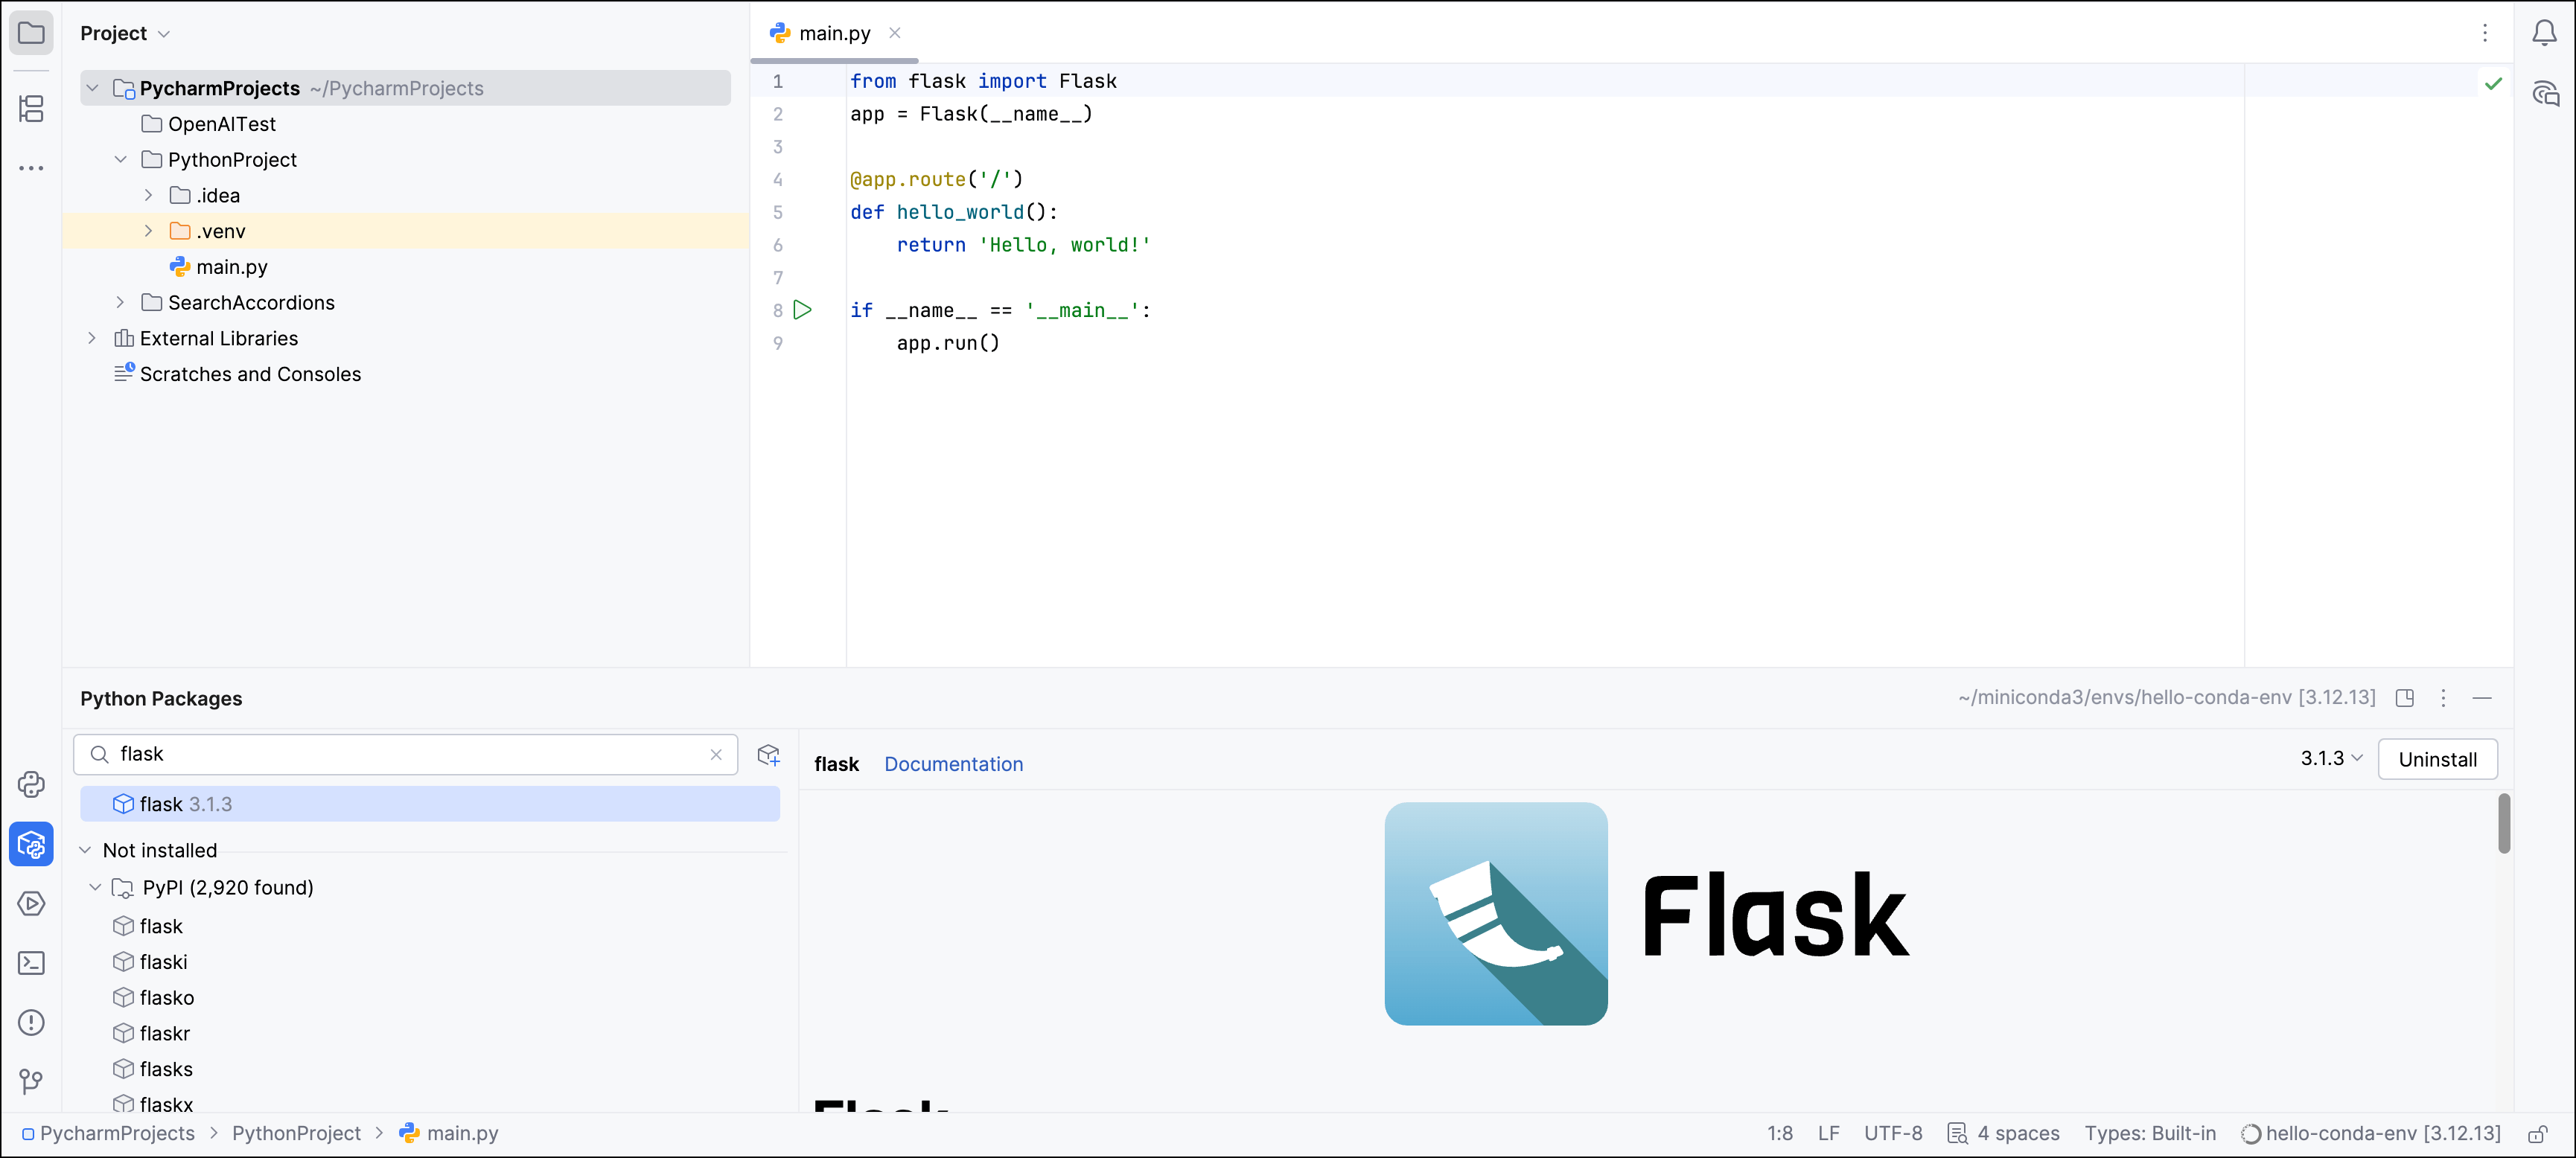
3. After `flask` is installed, you can verify the installation in the **Python Packages** window. Click **Python Packages** in the bottom-left sidebar and search for "flask" to view the installed package.
2. Click **Install package flask** in the popup to install `flask` to the environment connected to your project.
3. After `flask` is installed, you can verify the installation in the **Python Packages** window. Click **Python Packages** in the bottom-left sidebar and search for "flask" to view the installed package.
 ## Adding a repository to a project
If your project requires packages from channels outside the Anaconda defaults, you can add a new repository to your PyCharm project using the **Python Packages** window.
1. In the **Python Packages** window, click **Options**, then select *Repositories...*.
2. In the Settings dialog under **Python > Package Repositories**, click **Add**.
## Adding a repository to a project
If your project requires packages from channels outside the Anaconda defaults, you can add a new repository to your PyCharm project using the **Python Packages** window.
1. In the **Python Packages** window, click **Options**, then select *Repositories...*.
2. In the Settings dialog under **Python > Package Repositories**, click **Add**.
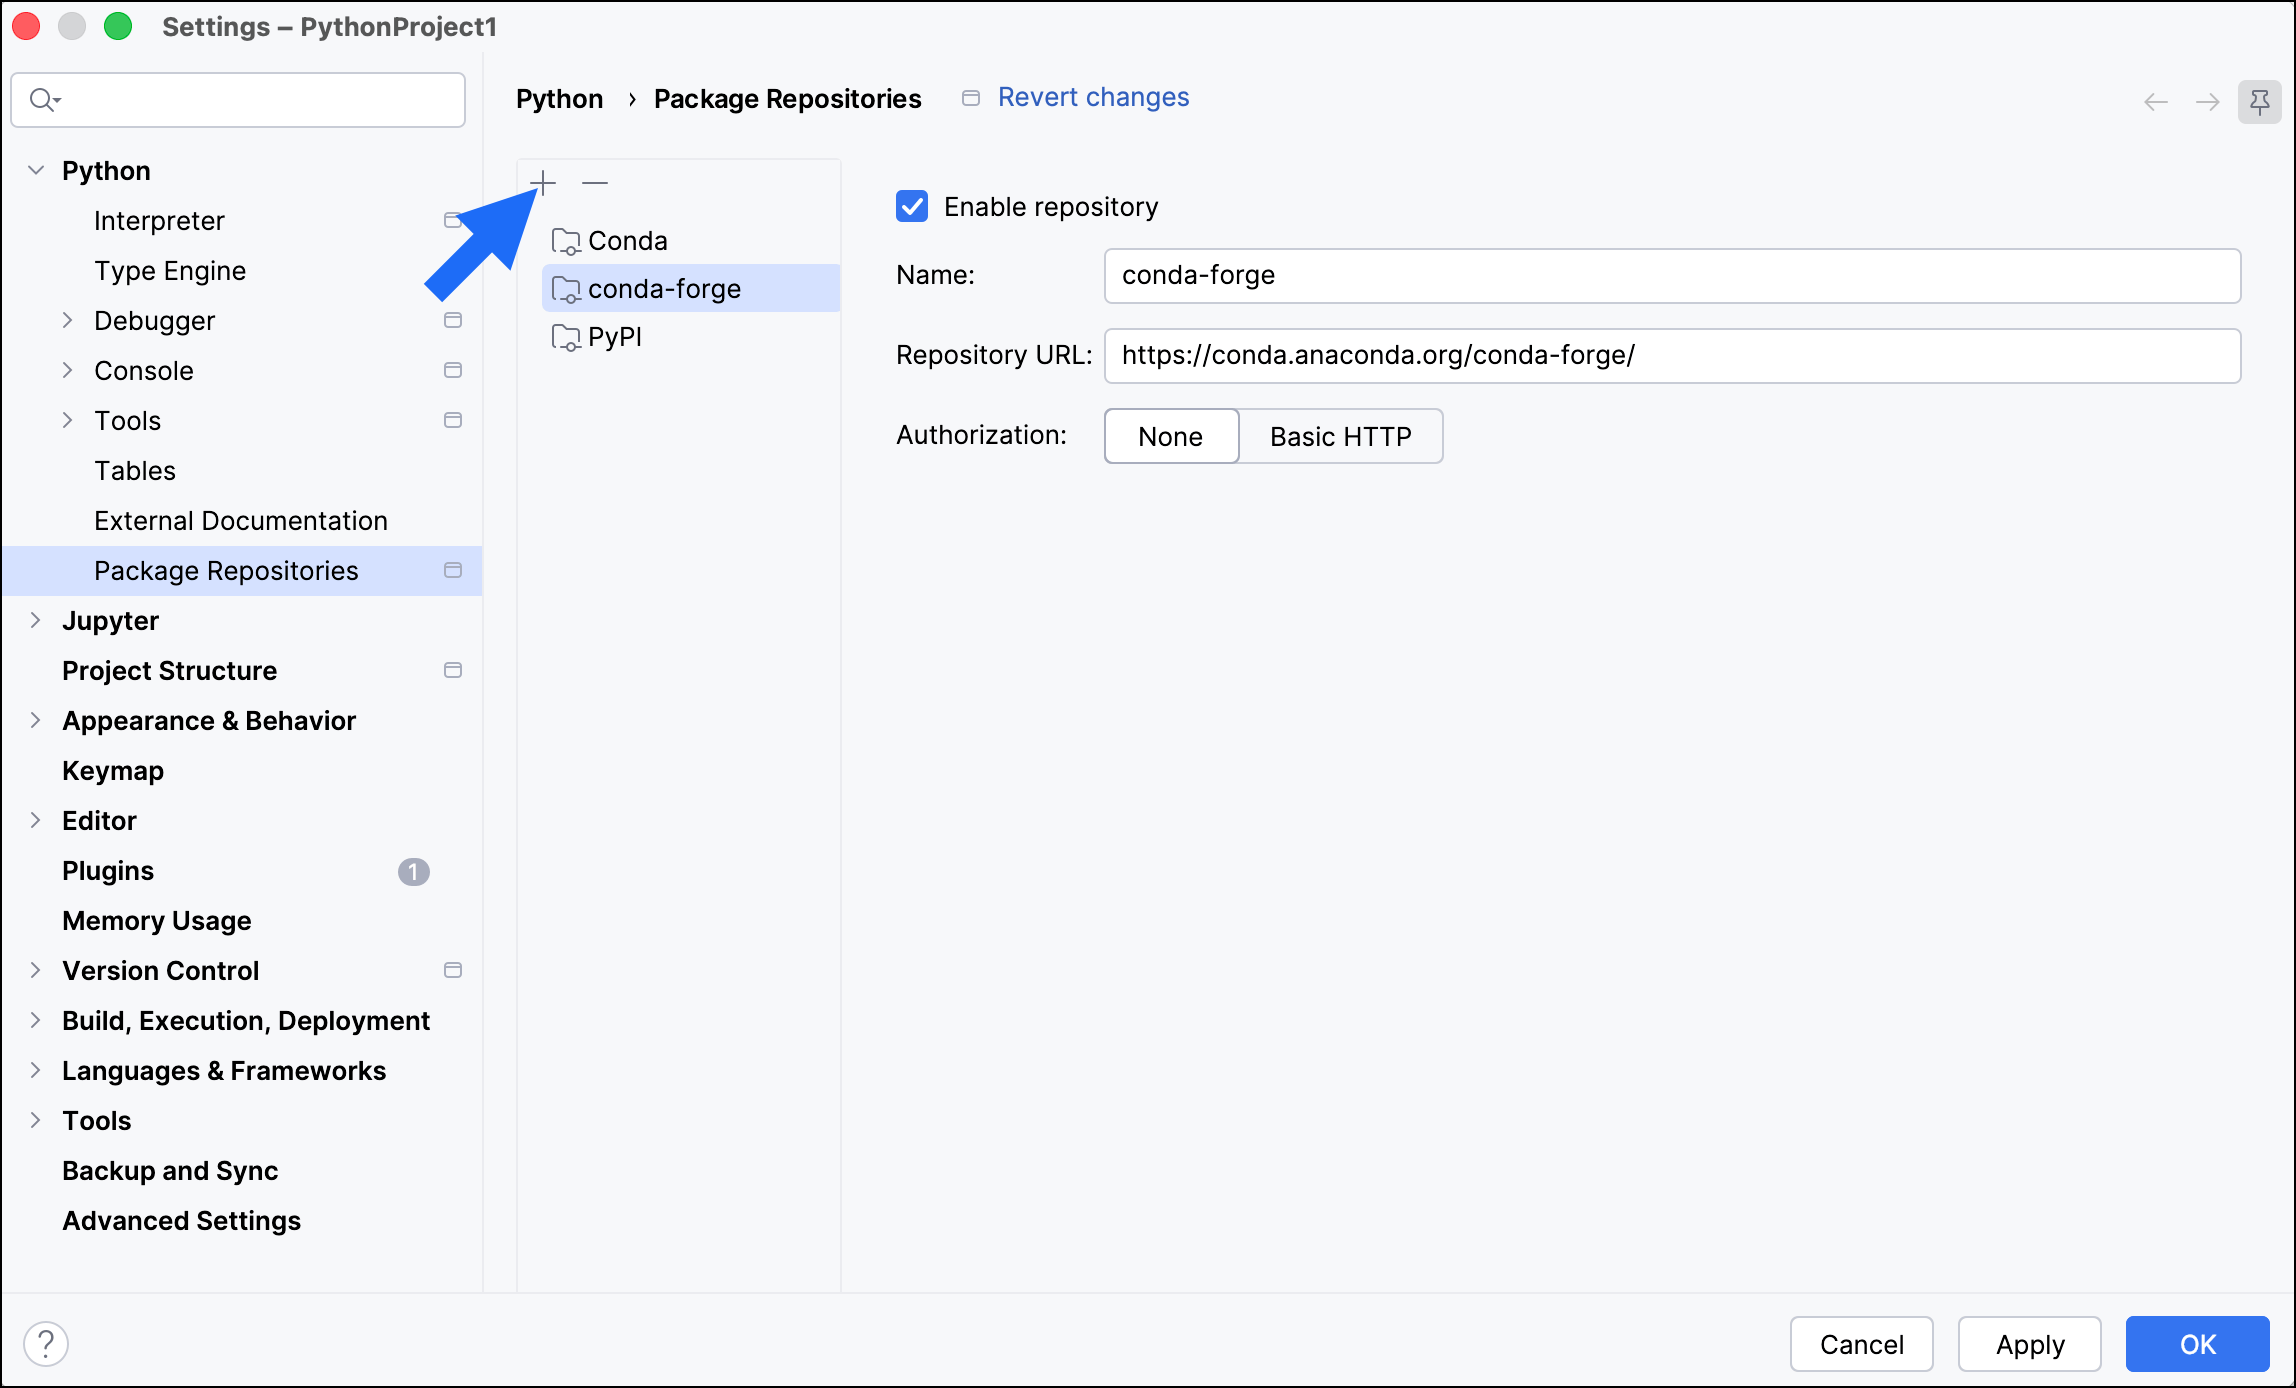 3. Enter the name of the repository in the **Name** field.
4. Enter the repository URL in the **Repository URL** field.
Channels on Anaconda.org use the URL `https://conda.anaconda.org/` for package repository access, not the `https://anaconda.org/` URL you see when browsing the channel on the website.
5. If the repository is local, select *None* for **Authorization**. Otherwise, select *Basic HTTP* and enter your username and password for the repository.
6. Click **OK**.
For repositories like conda-forge, the easiest way to install packages is to use Anaconda Prompt (Terminal on macOS/Linux). Activate your project's environment and install the package.
```sh theme={null}
conda activate
conda install --channel
```
Replace \ with the name of your environment.
3. Enter the name of the repository in the **Name** field.
4. Enter the repository URL in the **Repository URL** field.
Channels on Anaconda.org use the URL `https://conda.anaconda.org/` for package repository access, not the `https://anaconda.org/` URL you see when browsing the channel on the website.
5. If the repository is local, select *None* for **Authorization**. Otherwise, select *Basic HTTP* and enter your username and password for the repository.
6. Click **OK**.
For repositories like conda-forge, the easiest way to install packages is to use Anaconda Prompt (Terminal on macOS/Linux). Activate your project's environment and install the package.
```sh theme={null}
conda activate
conda install --channel
```
Replace \ with the name of your environment.
Replace \ with the name of the channel you want to source from.
Replace \ with the name of the package you want to install.
For more information on adding repositories to your PyCharm project's conda environment, see [the PyCharm documentation](https://www.jetbrains.com/help/pycharm/installing-uninstalling-and-upgrading-packages.html#custom-repositories).